Administration
Admin-only features are under the Admin menu in the menu bar. The Admin menu is visible to users with admin or engineer roles. Engineers can access monitoring features (Alert Rules, SNMP Targets, Credential Profiles, Notification Channels, Maintenance Windows, Device Sessions) but cannot manage users, system settings, API keys, audit logs, or backups. Operator-role users cannot see the Admin menu.
Admin > Users & Security > Users
- Create users: Set username, password, display name, and role (admin, engineer, or operator).
- Edit users: Change display name, role, or active status.
- Reset passwords: Admin can reset any user's password.
- Delete users: Remove user accounts (cannot delete yourself).
Password complexity requirements are enforced per the settings in Admin > System Settings > Security (see System Settings below).
Admin > Users & Security > Login Sessions
View currently logged-in users:
- Username, IP Address, User Agent, Last Activity
- Activity status: online (active), idle, offline
- Force Logout: Revoke individual sessions or all sessions for a user
- Auto-refreshes every 15 seconds
Admin > Users & Security > API Keys
Create API keys for headless or automated access:
- Click Create Key.
- Set a name, role (admin/engineer/operator), and optional expiration.
- The raw key is shown once -- copy it immediately.
- Use the key via HTTP header:
X-API-Key: osprey_<key>
API keys bypass JWT authentication and are ideal for scripts, monitoring integrations, and CI/CD pipelines.
Admin > Users & Security > Authentication
Osprey signs users in through your existing identity provider (Entra ID, Okta, Keycloak, or any OIDC-compliant IdP). Users are provisioned automatically on first sign-in and their role follows your IdP groups.
Setup:
- Set the External URL under Admin > System Settings > Authentication — the canonical HTTPS address of your Osprey installation (e.g.
https://osprey.example.com). All redirect URIs derive from it. - Open Admin > Users & Security > Authentication and click Add OIDC provider.
- Enter the Issuer URL and Client ID from your IdP's app registration; add the Client secret if your registration is a confidential client (public clients using PKCE need none). For an IdP on a private/RFC1918 address, enable Allow provider on a private network.
- Copy the displayed Redirect URI into your IdP's app registration.
- Configure the role mapping: each row maps an IdP group to an Osprey role; the highest matched role wins (admin > engineer > operator). The default role applies when no group matches — set it to Deny access to admit only mapped groups. Use the built-in preview to test group combinations.
- Click Test to verify TLS, discovery, and JWKS reachability per check, then enable the provider. It appears as a button on the login page.
SAML 2.0: click Add SAML provider. Give it the IdP's metadata (a URL, or paste the XML), copy the displayed SP metadata URL into your IdP to register Osprey as a service provider, then map the assertion's group attribute to roles. Osprey generates and stores its SP signing keypair automatically on first use — no openssl required. SAML providers appear as login-page buttons (SP-initiated flow only; IdP-initiated sign-in is intentionally not supported).
LDAP / Active Directory: click Add LDAP provider instead. Directory accounts sign in through the normal username/password form (no separate button): Osprey searches the directory, binds as the user to verify the password, and provisions the account on first sign-in with the role from the group mapping. Configure the directory URL (ldaps:// recommended; plain ldap:// without StartTLS fails the connection test), an optional service account (Bind DN + password) for the user search, the Base DN, and — for Active Directory — enable Resolve nested groups for transitive group membership. Directories without a memberOf overlay (plain OpenLDAP) use the Group search filter instead (e.g. (&(objectClass=groupOfNames)(member=%s))). Local Osprey accounts are never tried against the directory, so a mistyped local password cannot leak to AD or trip AD lockouts; directory outages are logged and never count toward Osprey's login lockout.
Notes:
- Roles of SSO users are re-evaluated at every sign-in — the IdP is the source of truth. Manually changing an SSO user's role in User Management is disabled for that reason; adjust the group mapping instead.
- Entra ID omits the groups claim beyond 200 groups ("groups overage"). Prefer app roles, or enable Fetch groups via userinfo on the provider.
-
Local-login policy (Admin > System Settings > Authentication):
enabled(default),admins_only(password form collapses behind a link), ordisabled(form hidden; administrators can still reach it via/?local=1). Administrators can always sign in with a password — a dead IdP never locks everyone out. - Linking an SSO identity to an existing local account by email is off by default (email reuse at an IdP is an account-takeover vector). When off, such sign-ins fail with "an account with this email already exists".
- Disabling or deleting a provider revokes all sessions of its users immediately; remaining access ends within the access-token lifetime (15 minutes by default).
- Every sign-in event (success, failure with reason, SSO, token replay) is recorded in Admin > Audit Log under entity type
auth.
Automatic provisioning (SCIM 2.0): Osprey can be a SCIM target so your identity provider creates, updates and deactivates accounts automatically. Under Admin > Users & Security > Authentication, generate a SCIM provisioning token (shown once — copy it immediately) and give your IdP the base URL https://<your-osprey>/api/v1/scim/v2 with that token as the bearer credential. Provisioned users sign in through SSO (no local password) and start with the read-only operator role; their real role follows your group mapping at first sign-in. Deprovisioning (the IdP marks the user inactive or removes them) deactivates the account and ends its sessions within minutes. Revoke a leaked token from the same screen — revoking keeps its history, unlike deleting.
Break-glass recovery (all IdPs down, or all admins locked out) — on the Osprey host:
# Reset a password (also converts an SSO account back to local login):
osprey auth reset-password admin --db-url "postgres://osprey:<pw>@localhost:5432/osprey?sslmode=disable"
# Re-enable password login for all roles:
osprey auth enable-local-login --db-url "..."
# Disable a compromised provider and revoke its users' sessions:
osprey auth disable-provider <name> --db-url "..."Every user can add a time-based one-time code (TOTP) as a second factor. Click the shield icon in the top-right header to open Account Security, then Enable: scan the QR code with an authenticator app (or type the key manually), enter the 6-digit code to confirm, and save the recovery codes shown once — each works a single time if you lose your device. At the next sign-in, after your password you'll be asked for the code (or a recovery code).
- MFA can be made mandatory for chosen roles in Admin > System Settings > Authentication (
auth.mfa.required_roles); users in those roles are prompted to enroll. - Admins can clear a user's second factor (lost device) with Reset MFA in User Management; the user re-enrolls at next sign-in.
- Single sign-on accounts do their second factor at the identity provider, not in Osprey.
Admin > Device Sessions
See SSH Terminal > Session History.
Admin > Monitoring > Alert Rules
Create, edit, enable/disable, and delete alert rules. System rules (e.g., SNMP Target Failure) can only be toggled, not edited or deleted. Templates for common traffic and error rules are available via the Add from Template button. See Alerts & Incidents for details on alert behavior.
Admin > Monitoring > SNMP Targets
Manage devices polled for traffic statistics:
- Add targets with IP, SNMP version, and credentials
- Auto-discover: Discover devices from seed IPs
- Monitor status: active, disabled, consecutive failures
- Targets auto-disable after a configurable number of consecutive failures (default 10, configurable in System Settings)
- Re-enable manually to resume polling
Admin > Monitoring > Credential Profiles
Create reusable SNMP credential templates:
- v2c profiles: Named community string
- v3 profiles: Username, authentication (MD5/SHA), privacy (DES/AES)
Profiles can be referenced by multiple SNMP targets and collectors, eliminating credential duplication.
Security: All SNMP credentials (community strings, v3 auth/priv passwords) are encrypted at rest in the database using AES-256-GCM when
OSPREY_ENCRYPTION_KEYis configured. The Debian installer generates this key automatically. API responses always mask credentials with***.
BMP targets are managed directly from the sidebar. Create a BGP protocol instance (see Setting Up BGP Monitoring), then expand it in the sidebar to manage targets. Targets can also be managed via the REST API (/api/v1/bgp/targets).
Sidebar management:
- Hover over a BGP protocol instance in the sidebar and click + > Add Target.
- Enter a name, router IP, and RIB mode in the quick-add dialog.
- The target appears under the protocol instance with a status indicator.
- Right-click a target for options: View Peers, View Routes, Copy IP, or Delete.
- Toggle enable/disable with the inline toggle button.
RIB modes: loc_rib (router's best paths), adj_rib_in_post (all received routes post-policy), none (peer monitoring only).
Status indicators: Pending (awaiting connection), Connected (green, active session), Disconnected, Error (red).
When a target is deleted, all associated BGP peers and RIB data are automatically removed.
Note: The BMP server listens on TCP port 11019 by default. Configure this in
osprey.yamlunderbmp.listen_address. Thebmp.allowed_cidrssetting restricts which IPs can connect.
Admin > Monitoring > Notification Channels
See Alerts & Incidents > Managing Alerts for channel type details (webhook, email, Slack, Teams, in-app).
Admin > Monitoring > Maintenance Windows
See Alerts & Incidents > Maintenance Windows for setup details.
Admin > System Settings
Runtime configuration in a tabbed layout with a vertical sidebar for section navigation (Display, Topology, Routing, Retention, Security, Authentication, License). Each tab shows a blue dot when it has unsaved changes. Settings are saved all at once with the Save button. The dialog warns you before discarding unsaved changes. A Reset to Defaults button at the bottom-left restores all factory defaults.
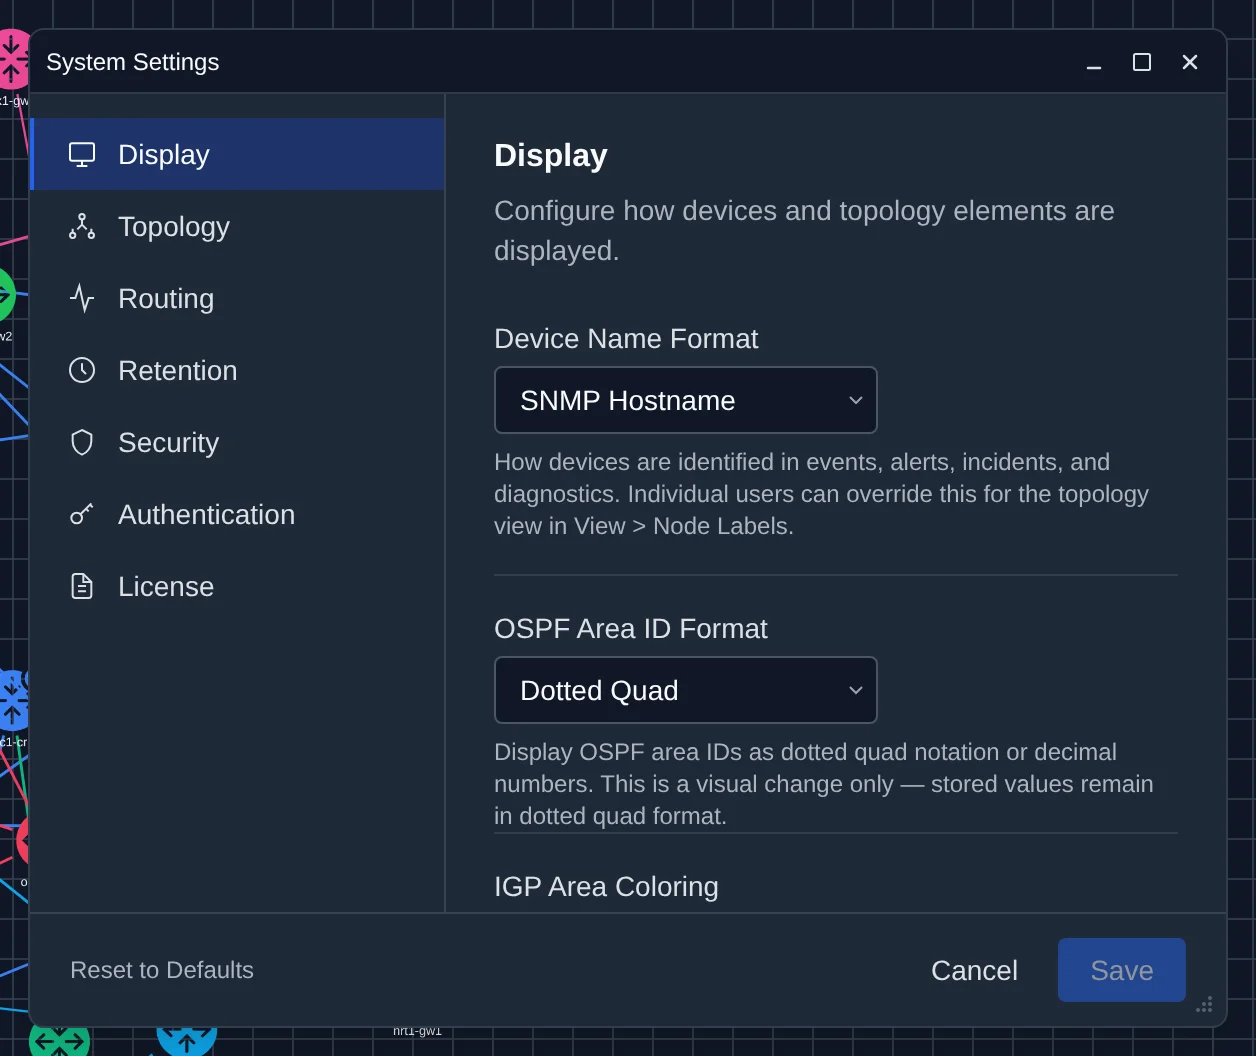
-
Device Name Format: How devices are labeled across the UI (events, alerts, incidents, diagnostics). Individual users can override this for the topology canvas via View > Node Labels. IS-IS devices display hostname from TLV 137 (Dynamic Hostname) as the primary label; the name fallback chain is: hostname > router_id > system_id.
-
hostname-- SNMP sysName or IS-IS Dynamic Hostname (TLV 137) (default) -
dns-- Reverse DNS (PTR) name -
router_id-- OSPF router ID or IS-IS system ID -
hostname_ip-- Hostname with router ID in parentheses
-
-
OSPF Area ID Format: How OSPF area IDs are displayed throughout the application — sidebar, canvas, reports, alerts, and panels. This is purely visual; stored values always remain in dotted quad format. This setting does not affect IS-IS levels, which are always displayed as "Level 1" / "Level 2".
-
dotted_quad-- Standard dotted quad notation, e.g. 0.0.0.0, 0.0.0.1, 0.0.1.0 (default) -
decimal-- Decimal integer, e.g. 0, 1, 256. Shorter and often matches what is configured on routers (router ospf 1/area 0)
-
-
IGP Area Coloring: When a device runs both OSPF and IS-IS simultaneously, this determines which protocol's area membership is used for area-based coloring on the canvas.
-
OSPF areas-- Color by OSPF area membership (default) -
IS-IS areas-- Color by IS-IS level membership
-
- Area Cloud Auto-threshold: Number of areas that triggers automatic activation of Area Cloud Overview mode (range 2--100, default: 10). When the user checks this many or more areas in the sidebar, the canvas switches to the aggregated cloud view. Users can manually toggle the view regardless of this threshold. Set to a high value (e.g., 100) to effectively disable auto-activation.
- Stale Device Retention (hours): How long unreachable devices/links remain visible before auto-deletion. Range: 1--8760. Default: 168 hours (7 days). A warning appears if set below 24 hours, as brief maintenance windows could trigger device removal.
Administrative distance (AD) determines which protocol's routes are preferred when multiple protocols advertise the same prefix. Lower values are preferred. These settings affect the Route Path computation and the per-router RIB view.
- OSPFv2: Administrative distance for OSPFv2 routes (range 1--255, default: 110). Applies to all OSPFv2 route types (intra-area, inter-area, external). Internal preference within OSPF (intra > inter > external) is handled by OSPF metric comparison, not AD.
- OSPFv3: Administrative distance for OSPFv3 (IPv6) routes (range 1--255, default: 110). Separate from OSPFv2 to allow independent tuning in dual-stack environments.
- IS-IS: Administrative distance for IS-IS routes (range 1--255, default: 115). Applies to both Level-1 and Level-2 routes.
- EIGRP (internal): Administrative distance for internal EIGRP routes (range 1--255, default: 90).
- EIGRP (external): Administrative distance for redistributed EIGRP routes (range 1--255, default: 170).
- eBGP: Administrative distance for external BGP routes (range 1--255, default: 20). eBGP routes are learned from BMP peers in different autonomous systems.
- iBGP: Administrative distance for internal BGP routes (range 1--255, default: 200). A warning appears if iBGP AD is set lower than OSPFv2 AD, as this is unusual and would cause iBGP routes to be preferred over OSPF internal routes.
Example: With default values, a prefix advertised by both OSPF (AD 110) and eBGP (AD 20) will use the eBGP path. To prefer OSPF, set the OSPFv2 AD below 20 (e.g., 15).
- Event History: Days to keep topology events (range 1--365, default: 90).
- Topology Snapshots: Days to keep time-travel snapshots (range 1--365, default: 30).
- SSH Session Logs: Days to keep SSH/telnet session recordings (range 1--365, default: 90).
- Audit Log: Days to keep admin audit entries (range 1--365, default: 90).
- Alerts: Days to keep alert history (range 1--365, default: 90).
- Incidents: Days to keep incident records (range 1--365, default: 90).
- User Sessions: Days to keep user session records (range 1--365, default: 90).
Note: Utilization history retention (for MRTG-style traffic graphs) is configured per network in the Enrichment panel, not in the Retention section.
SNMP and L2 discovery settings are no longer a global System Settings section — they are configured per network in the network's Enrichment panel (open it from the network row in the sidebar):
- Capability cards with per-capability toggles and intervals: interface discovery/enrichment, traffic counters, L2 enrichment (LLDP/CDP), and L2 switch crawling. Each card shows live health (last run, queue size, neighbor counts).
- Pause polling: per-network emergency toggle that stops SNMP collection for that network.
- Credential profiles: primary and fallback profile selectors (fallback is tried automatically when primary credentials fail).
- Advanced: PDU timeout, retries, auto-disable threshold, counter poll interval, L2 stale retention, include-routers-in-crawl, and L2 crawler operations (run a crawl cycle now, reset this network's crawler queue — admin only).
The tri-state LLDP/CDP and crawling toggles are also available inline in the network edit form in the sidebar. See Per-Network L2 Configuration.
Password Policy:
- Minimum Password Length: Range 4--72 (bcrypt limit). Default: 8.
- Require Uppercase Letter: Default: enabled.
- Require Number: Default: enabled.
- Require Special Character: Default: enabled.
Login Protection:
- Max Login Attempts: Consecutive failed logins before lockout. Set to 0 for unlimited (no lockout). Default: 5. A warning appears if set to 1.
- Lockout Duration (minutes): How long to lock an account after exceeding max login attempts (range 1--1440). Default: 15 minutes. This field is disabled and grayed out when Max Login Attempts is set to 0.
Transport:
- Disable SSH Terminal Proxy: When enabled, the SSH terminal proxy feature is completely disabled. The right-click "SSH to" context menu item is hidden, the SSH button in node detail panels is removed, and WebSocket connections for SSH are rejected at the API level with 403. Default: disabled (SSH proxy is available). Use this in environments where the proxy is not permitted by security policy.
- Allow Telnet Fallback: When enabled, the SSH terminal proxy falls back to cleartext telnet (port 23) if SSH (port 22) fails. Default: disabled. Warning: telnet transmits credentials in cleartext. This setting has no effect when the SSH terminal proxy is disabled.
Global sign-in settings that apply across every identity provider. Per-provider OIDC/SAML/LDAP setup itself lives on the separate Admin > Users & Security > Authentication page -- see Single Sign-On (SSO) above.
- External URL: The canonical HTTPS address of this Osprey installation; every provider's redirect URI derives from it.
-
Local-login policy:
enabled(default),admins_only, ordisabled-- see the Notes under Single Sign-On (SSO) above for what each mode hides and how administrators always retain a way in. - Link SSO sign-ins to existing accounts by email: Off by default (email reuse at an IdP is an account-takeover vector).
-
MFA required roles (
auth.mfa.required_roles): Which roles must enroll two-factor authentication -- see Two-Factor Authentication (TOTP) above.
- Status table: Shows current license state — licensee, tier, node limit, current nodes, validity dates, and days remaining.
- Upload: Paste a license key into the text area and click Upload License. The key is validated against the embedded Ed25519 public key. On success, the license is activated immediately and persisted to the database.
- Evaluation mode: When no license is installed, Osprey runs in evaluation mode with full functionality and a hard limit of 32 monitored nodes. The sidebar footer shows "Evaluation Mode — 32 nodes maximum".
- Grace period: Expired licenses continue working for 30 days with amber UI warnings (top banner + sidebar). After the grace period, Osprey reverts to evaluation mode.
- Node enforcement: When the node limit is reached, new devices are not discovered. Existing devices continue receiving updates normally.
Admin > Audit Log
Immutable record of all administrative actions:
- Columns: Timestamp, User, Action (create/update/delete/toggle/refresh), Entity Type, Entity ID, IP Address
- Detail: Expandable JSONB detail showing what changed
- Filtering: By user, action type, entity type, and time range
- Export: CSV download
- Retention: Configurable in System Settings (default: 90 days)
Every admin action is automatically logged: creating users, modifying alert rules, changing system settings, enabling/disabling collectors, deleting devices, DNS refresh triggers, and more.
Admin > Backup & Restore
Osprey offers two backup levels:
| Configuration Backup (JSON) | Database Backup (SQL) | |
|---|---|---|
| What | Configuration only | Everything |
| Format | Readable JSON, portable | Raw SQL (pg_dump) |
| Use case | Migration to a new installation | Disaster recovery |
| Hierarchy | ✅ Networks, ASes, RDs, PIs, Areas | ✅ |
| Collectors & SNMP targets | ✅ (credentials redacted) | ✅ |
| Users & roles | ✅ (no passwords) | ✅ (with password hashes) |
| Alert rules & notifications | ✅ | ✅ |
| System settings | ✅ | ✅ |
| Maintenance windows | ✅ | ✅ |
| Topology (devices, links, interfaces) | ❌ (re-discovered automatically) | ✅ |
| Canvas layouts | ❌ | ✅ |
| User settings (theme, preferences) | ❌ | ✅ |
| Icon packs (imported Visio stencils) | ❌ | ✅ |
| SNMP credential profiles | ❌ | ✅ |
| API keys | ❌ | ✅ |
| SSH known hosts | ❌ | ✅ |
| Event history & time-travel data | ❌ | ✅ |
| Audit log | ❌ | ✅ |
| Restore mode | Additive (skips existing) | Destructive (replaces all) |
Click Export Configuration to download a JSON file with hierarchy, collectors, users, alert rules, SNMP targets, and system settings. This backup is designed for quick migration — after restoring, topology is automatically re-discovered by the collectors.
Click Export Database for a complete PostgreSQL dump. This includes all data: topology, canvas layouts, event history, icon packs, audit log, and everything in the configuration backup.
Encryption key note: The database dump contains SNMP credentials and notification channel secrets encrypted with the installation's OSPREY_ENCRYPTION_KEY. This SQL file can only be restored on an installation that uses the same encryption key. If you are migrating to a new machine, copy the encryption key first (see Migrating to a New Machine below).
- Click the file picker under Restore and select a previously exported
.jsonfile. - Review the entity count preview.
- Click Import Configuration, then confirm.
Configuration restore is additive — existing entities with matching names are skipped, not duplicated. No data is deleted. Credentials (SNMP community strings, notification passwords) are not included in configuration backups — you will need to re-enter them after restore.
- Click the file picker under Restore Database and select a previously exported
.sqlfile. - Review the file name and size.
- Click Restore Database, then confirm.
Warning: Database restore is destructive — it replaces the entire database. All current data is lost and replaced with the contents of the SQL dump. Services should be restarted after a database restore.
To migrate Osprey to a new installation with full history and working credentials:
- Export the database on the source machine (Admin > Backup & Restore > Export Database).
-
Copy the encryption key from the source machine to the new machine:
- The key is
OSPREY_ENCRYPTION_KEYin/etc/osprey/osprey.env.
- The key is
- Install Osprey on the new machine and configure it with the copied encryption key.
- Restore the database on the new machine (Admin > Backup & Restore > Restore Database).
- Restart all services after the restore completes.
Without the matching encryption key, the database restore will succeed but all encrypted credentials (SNMP communities, v3 passwords, notification channel secrets) will be unreadable. You would need to re-enter them manually.
If you only need to migrate configuration without history, use Export Configuration instead — it produces a portable JSON file that works on any installation (credentials are excluded and must be re-entered).