This add-on reads your RTSP cameras and re-serves each one as an Alexa/Echo-compatible HLS (HTTP Live Streaming) stream (H.264 Baseline, MPEG-TS segments). That's the one stream format Amazon's camera relay can actually decode — a plain go2rtc/Home Assistant HLS feed shows up black on an Echo Show because its segments drop the in-band SPS/PPS headers. This add-on produces clean, decodable segments instead.
It can also mix spoken announcements into a camera's audio track — so an "a car is approaching" message plays through the live camera view on the Echo instead of the usual Alexa announcement that tears the view down. See the Audio injection section below.
Each camera you configure is served on the add-on's port 8888 at:
http://<HA-IP>:8888/<name>/stream.m3u8— the live HLS streamhttp://<HA-IP>:8888/<name>/snapshot.jpg— a still JPEG (used as the Alexa thumbnail)
This add-on only produces the stream. Getting that stream to Alexa also needs HTTPS in front of port 8888 and a self-hosted Alexa Smart Home skill that hands the URL to Amazon. For why the stream must be H.264 Baseline MPEG-TS HLS, read the project README. For the complete end-to-end setup — Cloudflare Tunnel, the Cloudflare WAF rule that locks the streams to Amazon's fetchers, and the Alexa skill + AWS Lambda camera override — follow the step-by-step End-to-End Setup guide.
Everything is done from the add-on's own dashboard — click Open Web UI, or use the Alexa Cameras item in the Home Assistant sidebar. Its tabs:
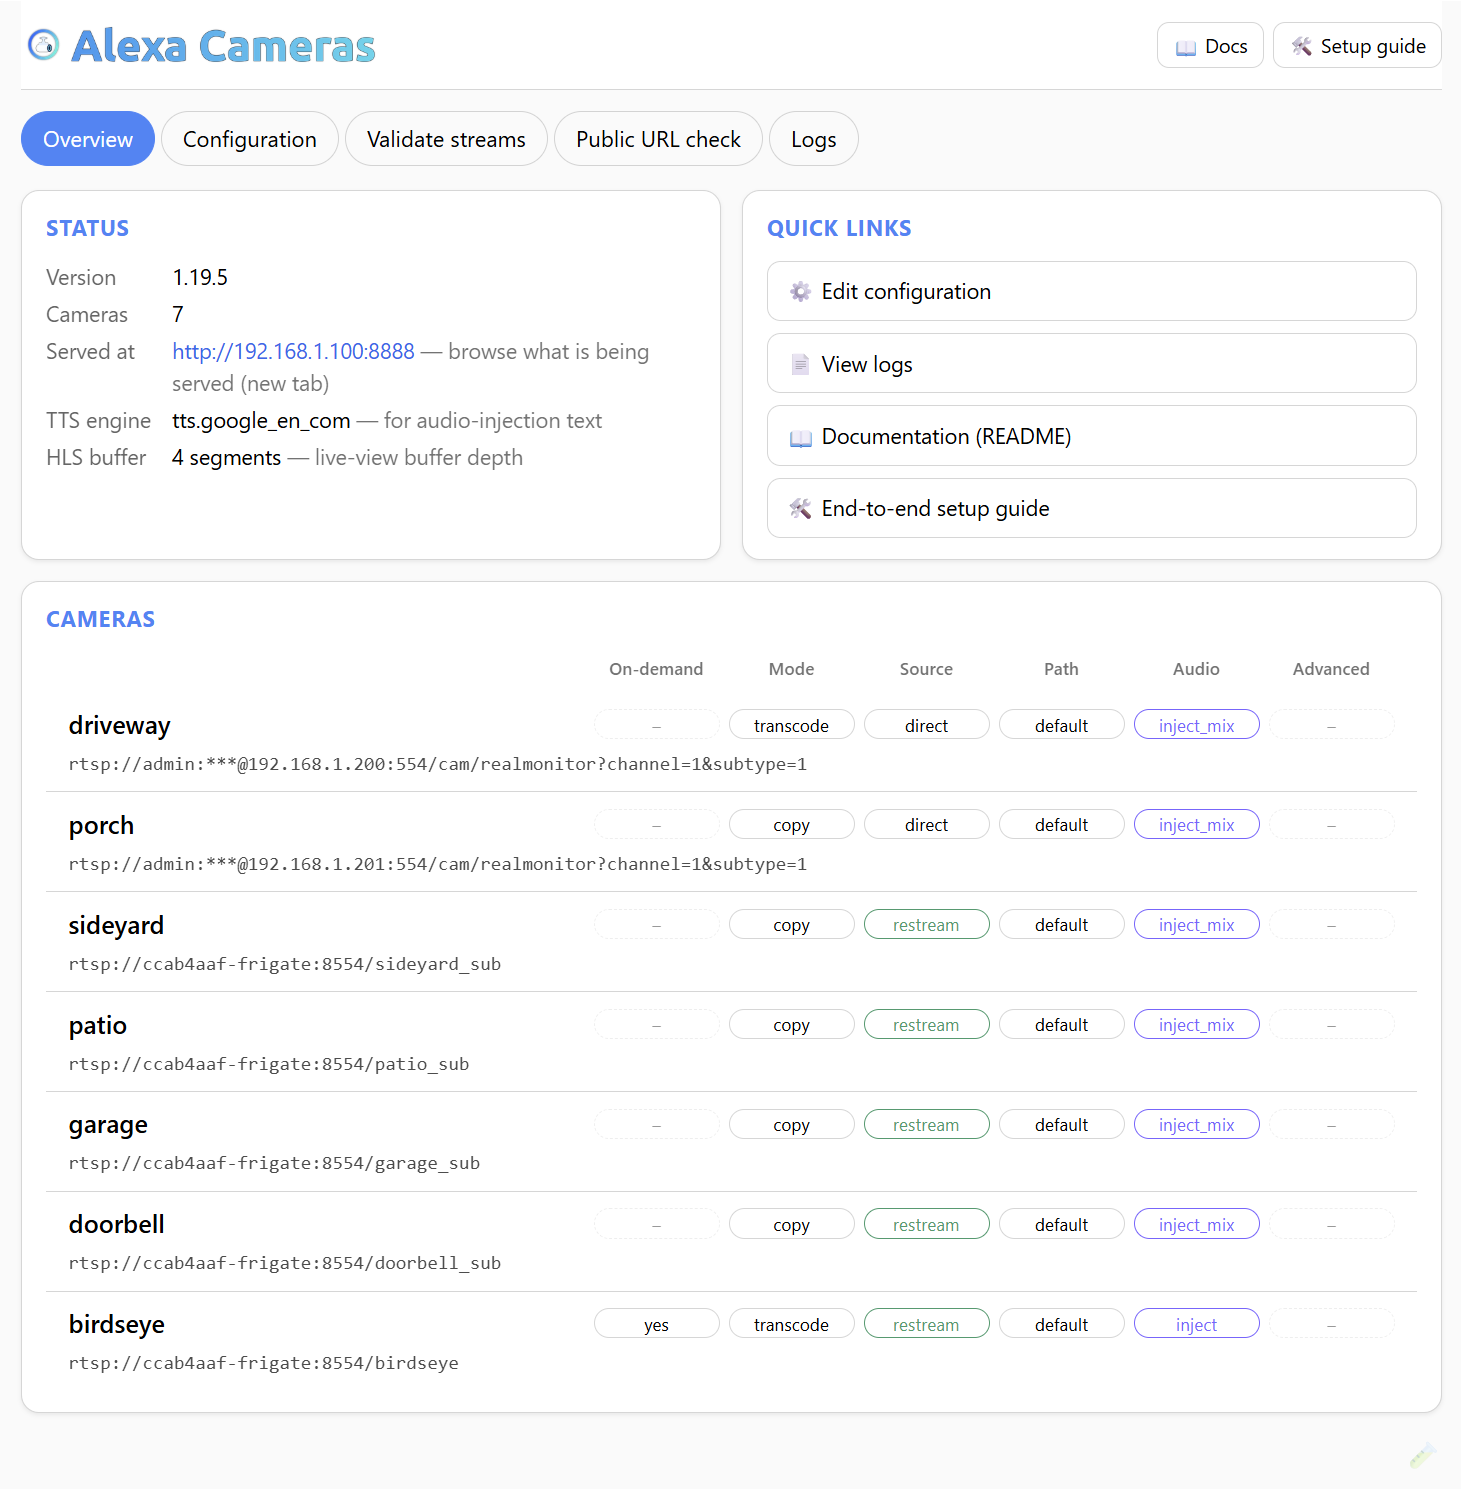
- Overview — status (version, camera count, a clickable Served at
http://<HA-IP>:8888link to browse the raw served files, the configured TTS engine used for audio-injection text, and the HLS buffer depth) plus a per-camera summary showing how the add-on read each camera — the same On-demand / Mode / Source / Path / Audio / Advanced pills as the Validate tab, so you can eyeball your whole setup at a glance without running the live checks. (An advanced pill flags a camera that has any per-camera override set; a camera'sinject/inject_mixaudio pill is clickable — click it to fire a test announcement through that camera, see Audio injection.) - Configuration — the form / YAML editor (covered next).
- Validate streams — per-camera Source + Output codec checks.
- Public URL check — compares the Internal LAN stream (
:8888) with your External HTTPS URL; a 403 on the external side is the good result. - Logs — live add-on output, and the quickest black-Echo triage.
You configure this add-on in its own Web UI, not in the Home Assistant Configuration (Options) tab. Open the add-on and click Open Web UI, or use the Alexa Cameras item in the Home Assistant sidebar, then go to the Configuration tab.
- Settings are stored in the add-on's own
/data/config.yamland applied instantly on save (the camera streams restart in place — no add-on restart needed). - The add-on has no settings in the Home Assistant Configuration (Options) tab — that tab is intentionally empty; everything lives in the Web UI.
The Configuration tab has a form with a View as YAML toggle — use whichever you prefer; they edit the same file. Cameras are shown as a read-only summary; click Edit on a row (or + Add camera) to open a per-camera dialog with dropdowns and validation (see Cameras). As you change anything, the edited fields highlight and an ● Unsaved changes marker appears by the Save & apply button (at the bottom of the form); leaving the tab with unsaved edits prompts first, so a half-finished change is never silently lost. Nothing takes effect until you Save & apply.
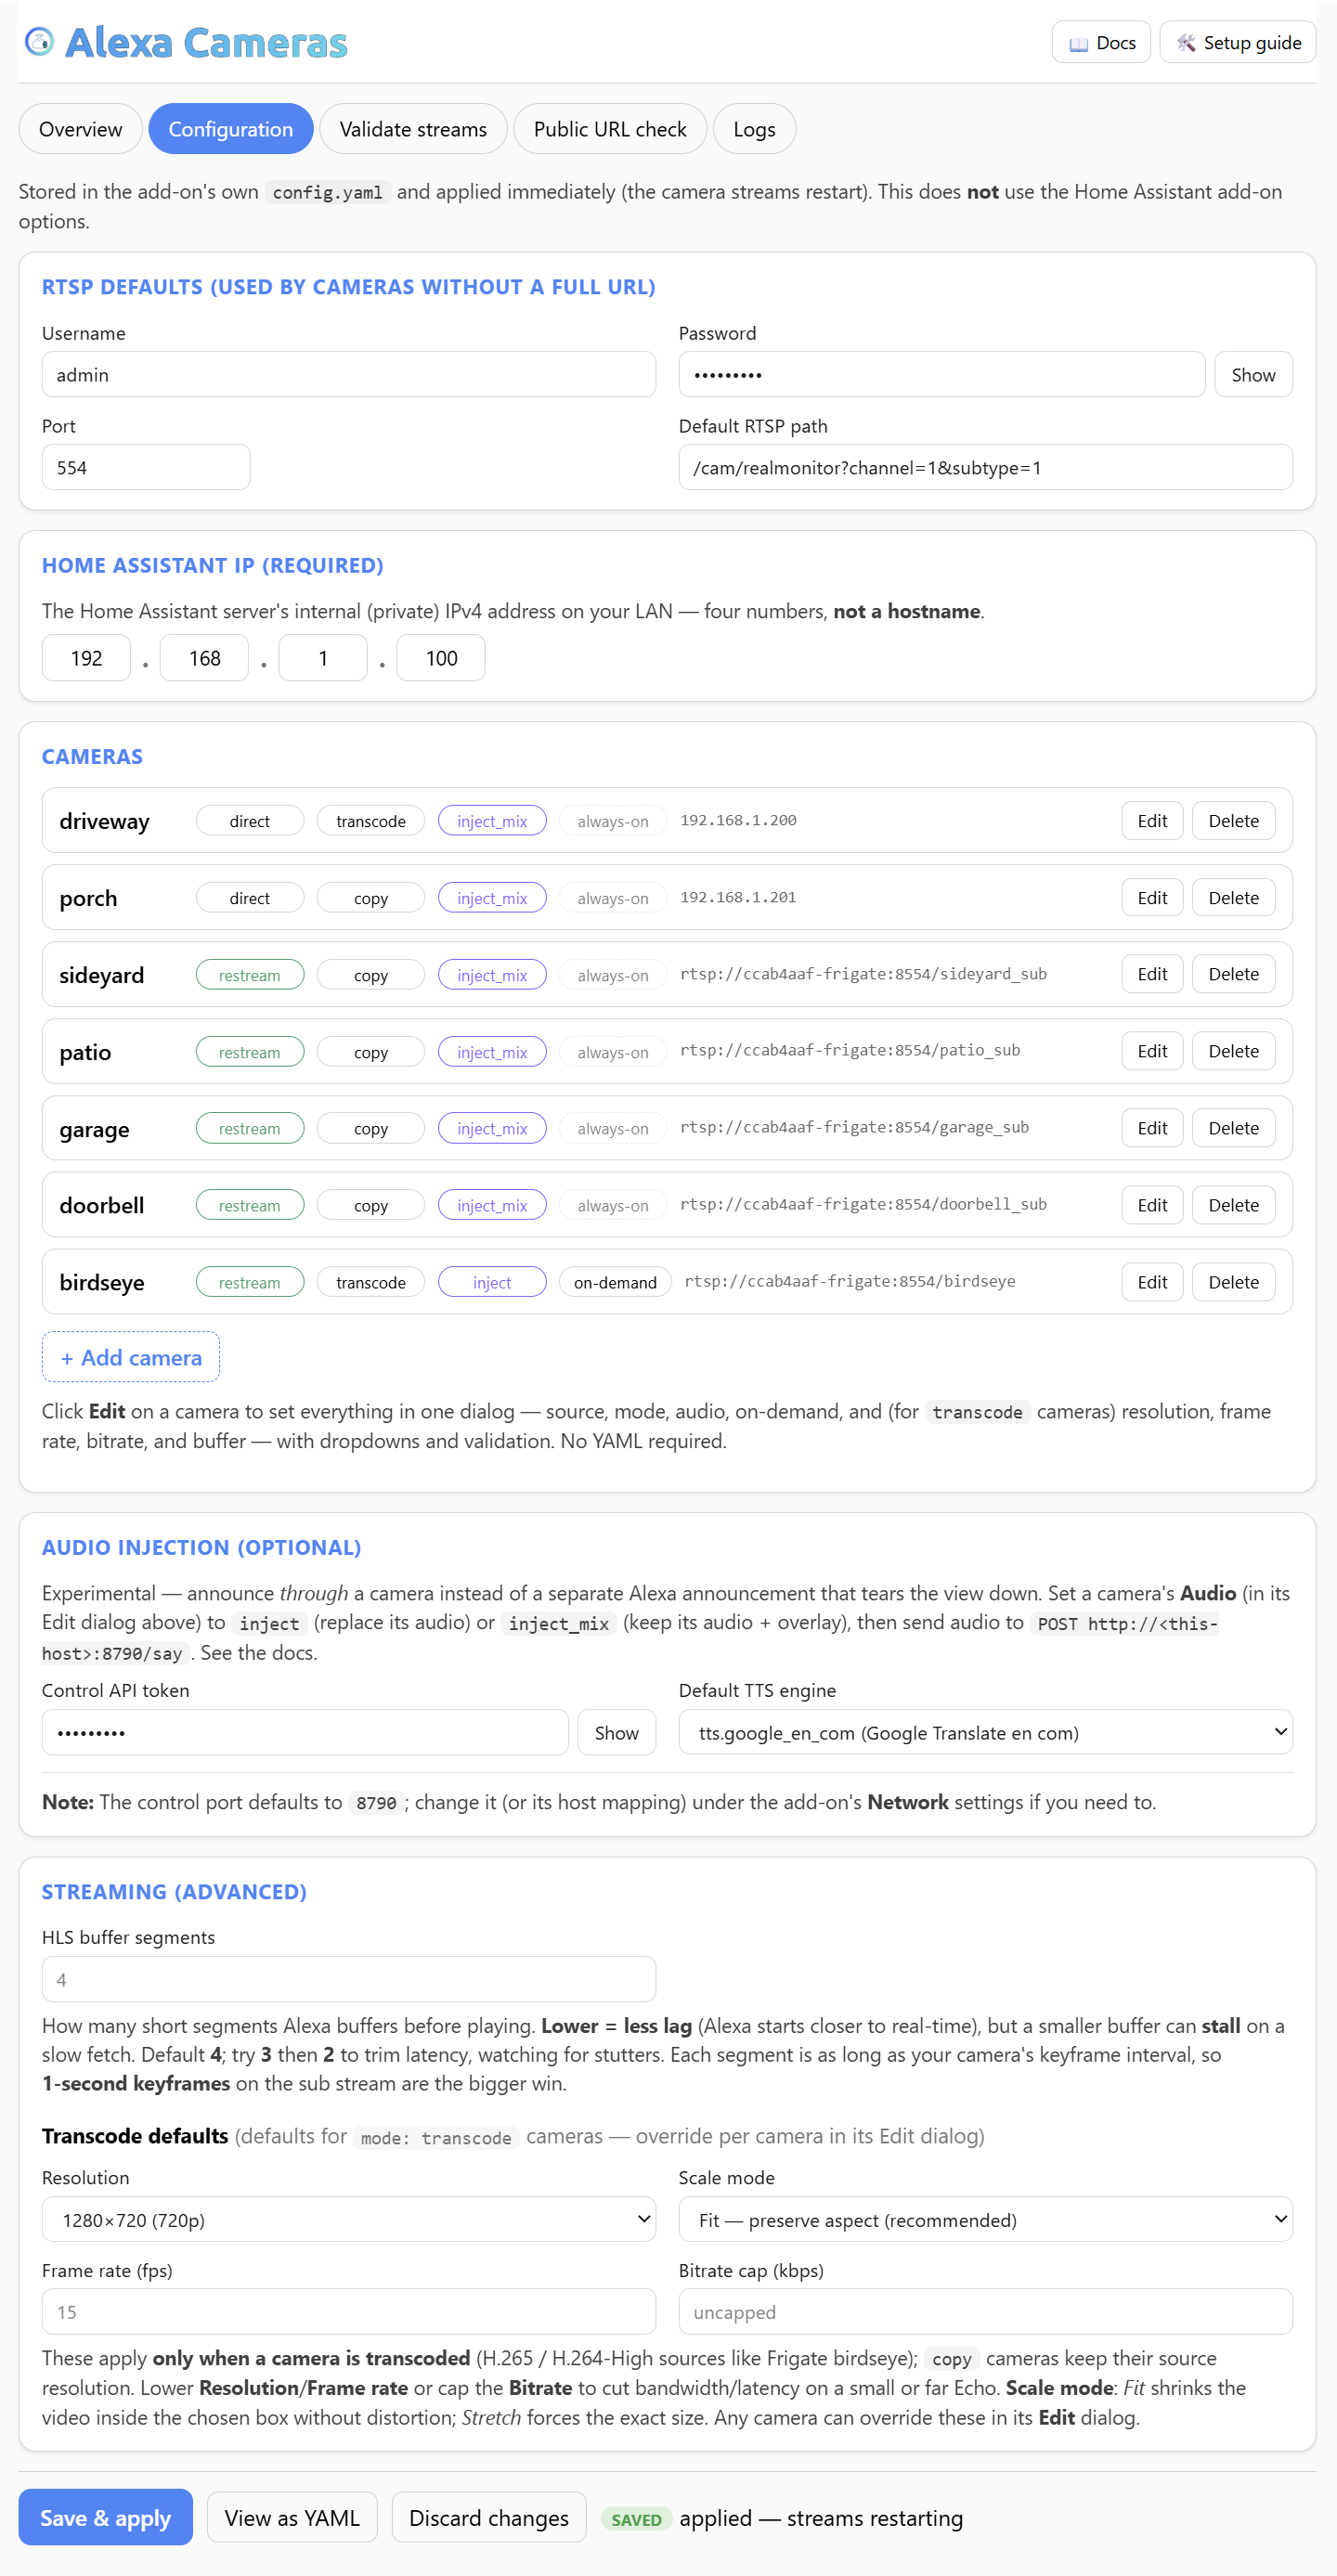
- Start the add-on, then Open Web UI → Configuration.
- Set the Home Assistant IP (required) — your HA server's private LAN IPv4 (the four
boxes, e.g.
192.168.1.100). This is used for the "Served at" and "Internal" links. - Fill in RTSP defaults (username / password / port) — the login shared by your cameras.
- Add a camera: a
name(lowercase, no spaces), a host (its IP) or a full url, and a mode (copyif the source is already H.264 Baseline/Main, elsetranscode). - (Optional) To announce through a camera instead of a separate Alexa announcement
that tears the view down, set that camera's Audio to
injectorinject_mixand fill in the Audio injection panel (a control-API token and default TTS engine). See the Audio injection section below. - Save & apply. Then use the Validate streams tab to confirm each camera, and the Logs tab if something's wrong.
RTSP is the standard way IP cameras stream live video. To pull a camera's feed, the add-on
builds a link that looks like rtsp://username:password@camera-ip:554/path. These settings fill
in the parts that are usually the same for every camera — the login, the port, and the
stream path — so you enter them once here instead of on each camera. (A camera you set up with a
full url ignores these and uses whatever is in that URL.)
| Field | Required | Description |
|---|---|---|
Username (rtsp_user) |
No | The username you log in to your cameras with — the same account you'd type into the camera's app, its web page, or a viewer like VLC to see the video. IP cameras almost always require a login before they'll hand over their video stream. This one username is applied to every camera you add by IP/hostname; a camera set up with a full url uses whatever is in that URL instead. Many cameras ship with admin as the default — set this to the account you actually use. |
Password (rtsp_password) |
No | The password that goes with the username above — the login for your camera's video stream. It gets inserted into the RTSP link, so any characters that have a special meaning in a URL must be percent-encoded: @→%40, :→%3A, /→%2F, ?→%3F, #→%23, %→%25 (a $ is fine as-is). If the Logs show a repeating 401 Unauthorized, the camera rejected the login — almost always a wrong password or a special character that wasn't encoded. |
Port (rtsp_port) |
No | The network port your cameras use for RTSP. This is almost always 554 (the industry standard), so if you've never deliberately changed it, leave it at 554. Only change it if your camera or NVR documentation lists a different RTSP port. |
Default RTSP path (default_path) |
No | The last part of the RTSP link — everything after the camera's IP and port — that tells the camera which video feed to send. Most cameras offer two: a high-resolution main stream and a lower-resolution sub stream, and the exact path text differs by brand. This value is used for every camera that doesn't set its own Path, so if all your cameras are the same brand you set it once here. The shipped default /cam/realmonitor?channel=1&subtype=1 is the Amcrest/Dahua sub-stream — low-res, which is perfect for the small Echo Show screen and usually already H.264 (so copy works). Don't know yours? See the Finding your camera's RTSP path section below — you can discover it with VLC or the camera's web page. |
| Field | Required | Description |
|---|---|---|
Home Assistant IP (lan_ip) |
Yes | The local-network address of the machine running Home Assistant — the device this add-on is installed on (e.g. 192.168.1.100). You can find it in Home Assistant under Settings → System → Network, or in your router's list of connected devices. Enter it as four numbers in the boxes. Must be an IP, not a hostname, and it's required for a real reason: it's the exact address your Cloudflare tunnel must point at. The add-on publishes port 8888 on the HA host, so the tunnel's route (or additional_hosts service) has to target http://<this-IP>:8888 (see the setup guide).Entering it also gives you two ways to check your work. On the Overview tab, the Served at link shows http://<lan_ip>:8888 — the exact URL to copy into your tunnel's config. On the Public URL check tab, that same internal address is compared against your external HTTPS URL, so if the internal stream works but the external one doesn't, the problem is in the tunnel/WAF, not the add-on. Point the tunnel anywhere else — the homeassistant hostname (HA Core on :8123) or Frigate's go2rtc (:1984) — and the camera won't serve: a black screen. lan_ip and the tunnel target must be the same host. |
The Cameras panel is a read-only summary — one line per camera. Click Edit (or + Add
camera) to open a dialog where you set everything for that camera with dropdowns and validation:
the basics below, plus per-camera Advanced overrides for the streaming settings (HLS buffer, and —
for transcode cameras — resolution, scale mode, frame rate, bitrate) and an optional per-camera
announcement voice. Each override field is blank by default and inherits the global default
unless you set it: streaming settings from the Streaming (advanced) panel, the
voice from the Audio injection panel's TTS engine. No YAML required, though View as YAML remains
for bulk edits.
The Advanced section adapts to the camera's Mode: a transcode camera exposes the full set of
streaming overrides (HLS buffer, resolution, scale mode, frame rate, bitrate), while a copy camera —
which keeps its source resolution/fps/bitrate untouched — shows only HLS buffer segments, since the
rest wouldn't apply.
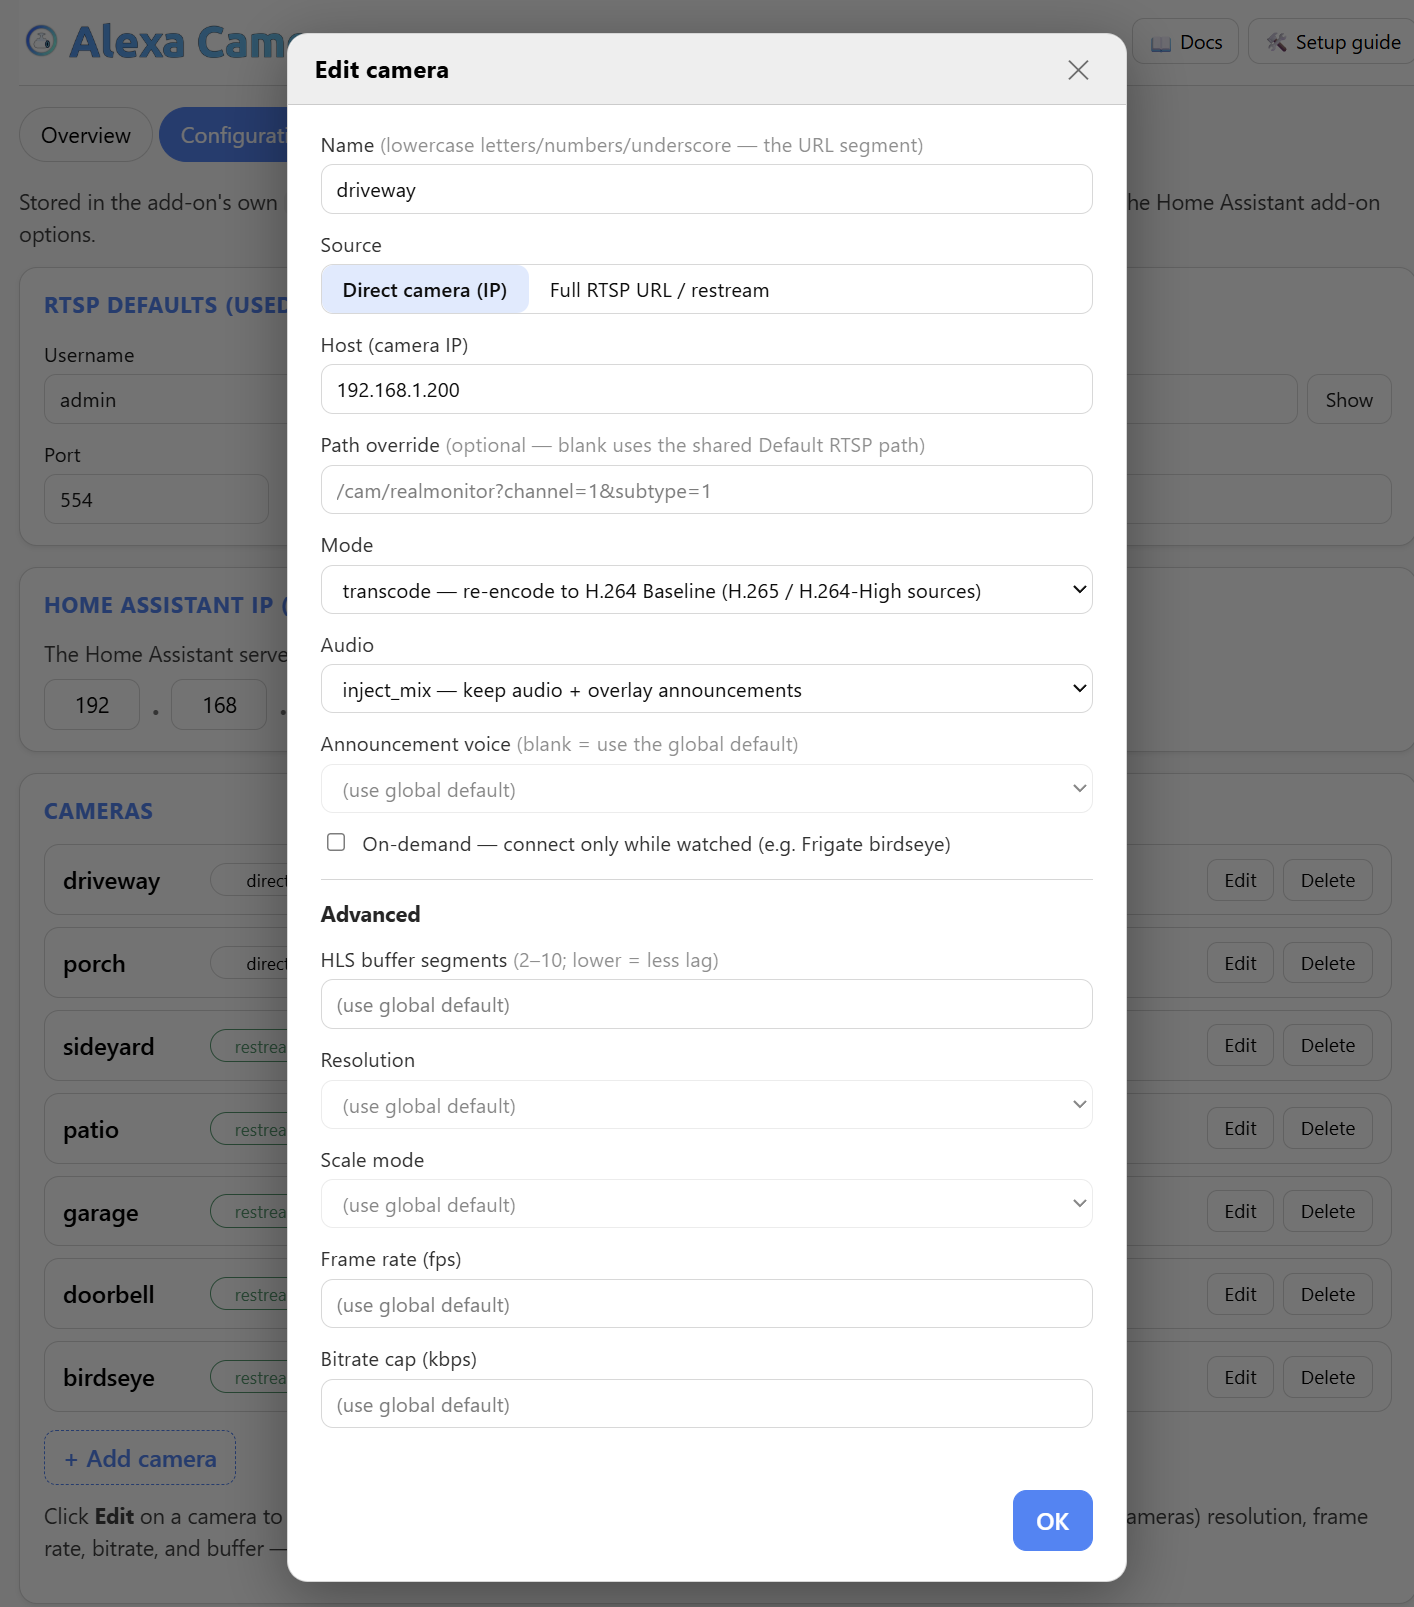
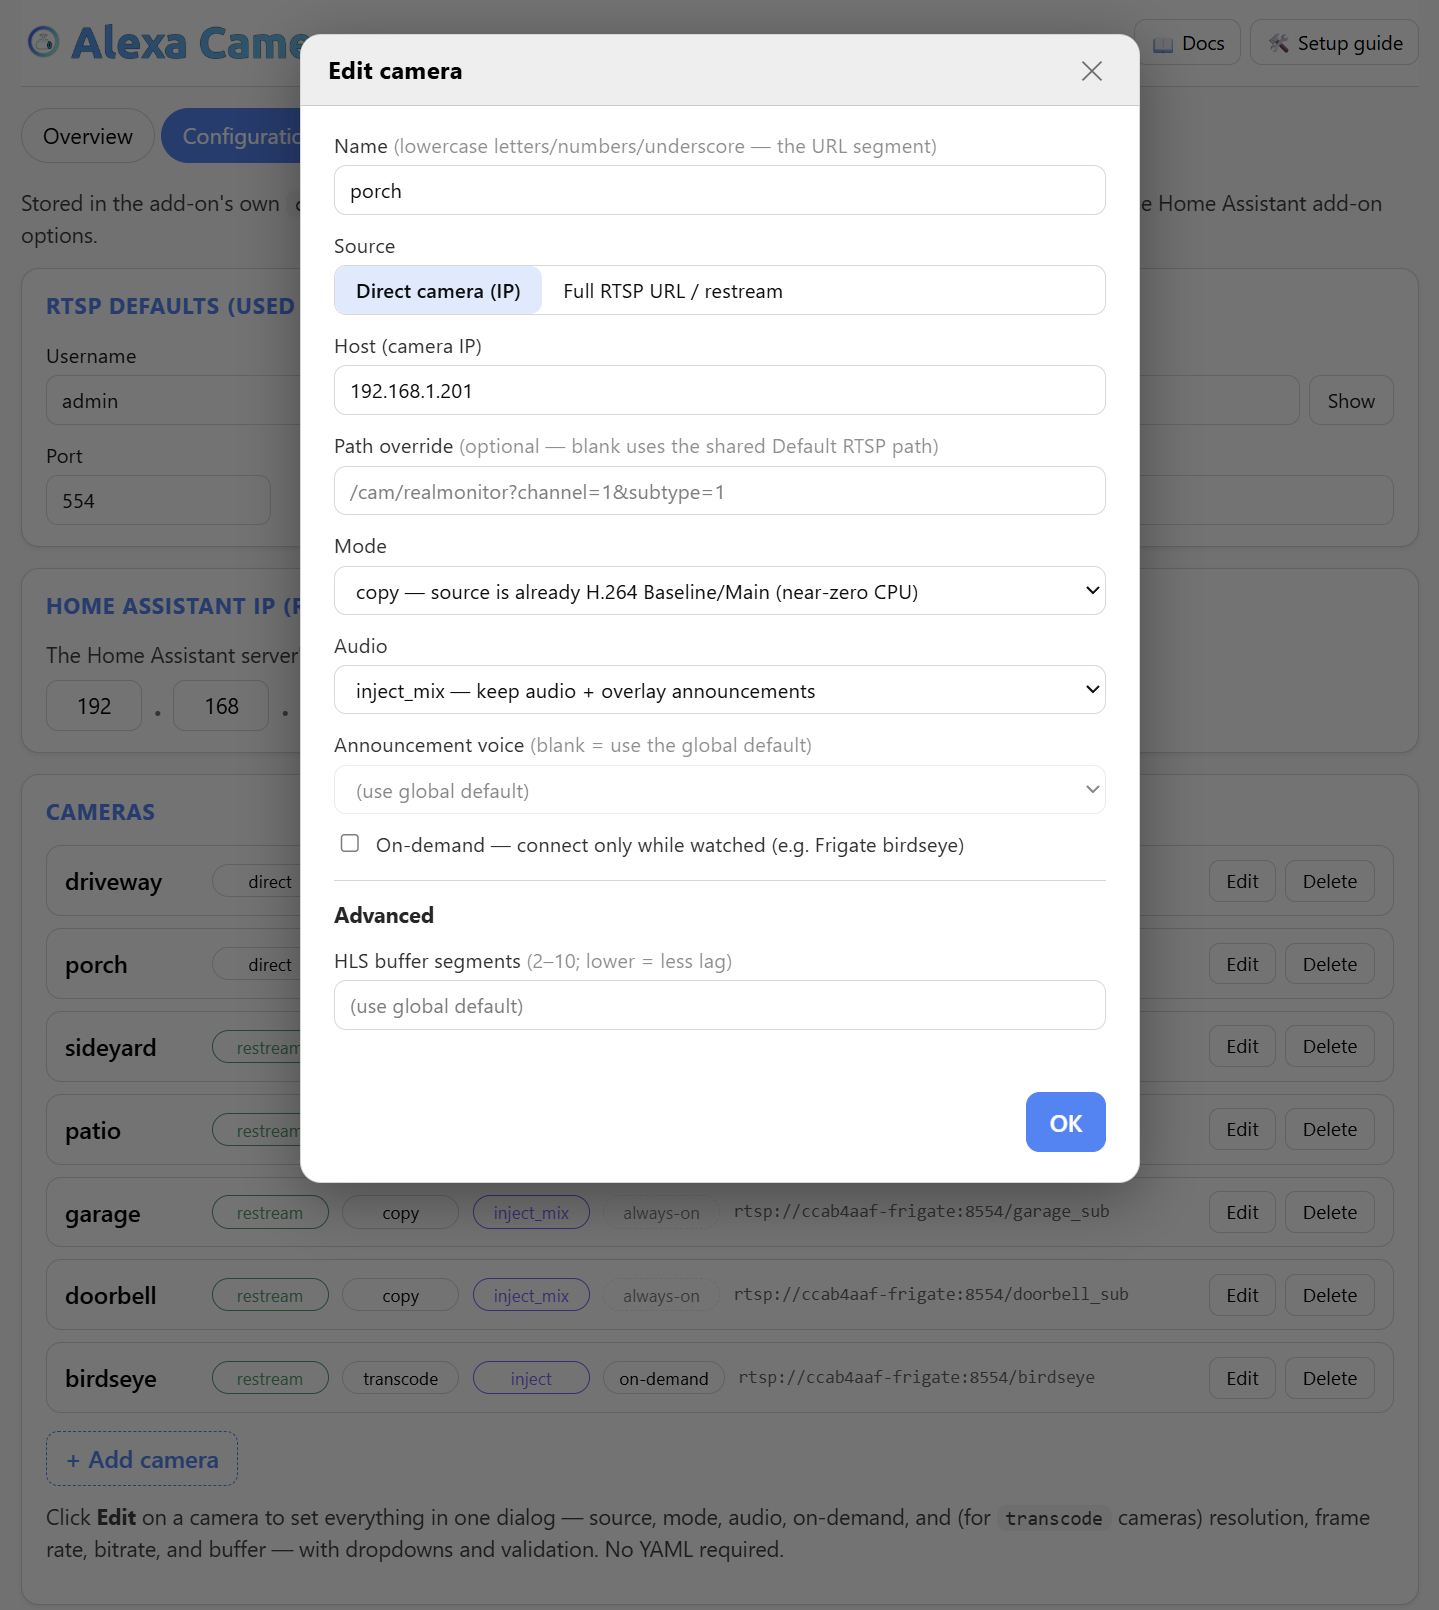
The Edit dialog for a transcode camera (left) vs a copy camera (right): the copy camera's Advanced
section collapses to just the HLS buffer, since the encode settings don't apply to a remux.
| Field | Required | Description |
|---|---|---|
Name (name) |
Yes | A short nickname for this camera, used only inside the stream's web address — the camera is served at /<name>/stream.m3u8. Keep it to lowercase letters / numbers / underscore with no spaces. It is deliberately not the name you speak to Alexa. Three separate identifiers are in play when you say "Alexa, show Porch":• What Alexa speaks / you say (e.g. Porch) — the camera entity's friendly name in Home Assistant (exposed via alexa: smart_home); spaces/capitals fine.• The routing key (e.g. porch) — the HA entity_id suffix, which becomes the Alexa endpointId.• This add-on's name (e.g. porch) — the URL segment.The last two are bridged by the CAMERA_MAP in your Alexa Lambda (endpointId suffix → add-on name; see the setup guide). They're conventionally identical, which is why they're easy to conflate — but a mismatch (add-on serves /porch_cam/ while the endpointId is porch, with no map entry) is a classic black screen: Alexa resolves the spoken name fine, then fetches a URL that 404s. Pick a nice friendly name in Home Assistant for what Alexa says, and keep this name matched to your Lambda map. |
Host (host) |
One of host/url | The camera's own address on your local network — its IP address (e.g. 192.168.1.100) or hostname. This is the camera itself, not Home Assistant. The add-on combines it with the Username, Password, Port, and Path above to build the full RTSP link it pulls video from. Find a camera's IP in your router's device list or the camera's app. Give a camera either a Host or a full URL — not both. |
URL (url) |
One of host/url | The complete RTSP link to a camera's stream, all in one field — e.g. rtsp://admin:pass@192.168.1.200:554/stream. Use this instead of Host when a camera doesn't fit the shared Username/Password/Port/Path pattern above, or for a non-standard source like a Frigate birdseye feed (rtsp://ccab4aaf-frigate:8554/birdseye). Whatever you enter is used exactly as typed and overrides all the RTSP defaults. If you fill this in, leave Host blank. |
Path (path) |
No | Overrides the Default RTSP path for this one camera only. Use it when most of your cameras share a path but one is different — for example, a camera that only exposes its high-res main stream (/cam/realmonitor?channel=1&subtype=0). Leave it blank to use the Default RTSP path above. A full URL already contains its own path, so this field is greyed out and ignored whenever a URL is set. |
Mode (mode) |
Yes | How the add-on prepares this camera's video for Alexa — the single most important per-camera choice, since it decides whether the add-on uses ~0% CPU or a real chunk of a core: • copy — the source is already H.264 (Baseline/Main), so ffmpeg only remuxes it into MPEG-TS. Near-zero CPU. Use this whenever you can.• transcode — the source is H.265/HEVC, H.264 High profile, or otherwise not Alexa-decodable, so ffmpeg re-encodes it (by default scales to 1280×720, 15 fps, H.264 Baseline — resolution/fps/bitrate are tunable under Streaming (advanced)). ~0.3–0.5 of a core per camera — use only where copy won't work.Audio (either mode): delivered as AAC 48 kHz stereo 64 kbps — copy passes the video through untouched but still normalizes audio to AAC (what Alexa requires).Rule of thumb: try copy first; if the Echo shows a black screen but the snapshot works, the source needs transcode.Tip (Amcrest/Dahua & most NVRs): set the camera's sub / second stream to H.264B (Baseline), ~720p, low bitrate, then use copy. Reserve transcode for sources you can't reconfigure — like Frigate birdseye (H.264 High). |
Audio (audio_source) |
No | Optional. Lets an Alexa announcement play through this camera's sound instead of interrupting the live view. Leave it blank for normal behaviour (the camera's own audio, if it has any). • inject — replace the camera's audio with the announcement (good for silent cameras like Frigate birdseye).• inject_mix — keep the camera's own audio and mix the announcement on top (needs a camera that actually has audio).Only relevant if you use the Audio injection feature (below). |
On-demand (on_demand) |
No | Tick this for a source that's expected to be idle / absent / 404 when nothing's consuming it — most notably a Frigate birdseye feed, whose go2rtc encoder pauses when idle. When set, the add-on makes the camera truly lazy: it connects to the source only while something is actually watching and makes zero connections when idle. It starts pulling the stream the moment something requests it, and disconnects again ~45 s after the last request. The point is efficiency — no reason to keep a rarely-watched source's encoder, and the add-on's transcode of it, running around the clock. It also quiets the predictable 404 / connection errors in the Logs, excludes the camera from the stall watchdog, and is skipped by Validate streams so validating doesn't wake it (its card shows Idle — on-demand with a Check on-demand stream button to test it deliberately).⛔ Do NOT tick this on a camera you show from an automation (e.g. auto-show birdseye on a detection — see the Bonus recipe). On-demand cannot win that race. The first request is what starts the stream, so it necessarily arrives before any playlist exists and gets a 404 — and Alexa does not retry: it treats the 404 as "camera unavailable" and gives up. The stream then spins up seconds later and plays to nobody. It is not a brief gap you can wait out: a cold Frigate birdseye takes ~60 s to produce its first segment (measured; idle_heartbeat_fps helps but doesn't remove it), which no client will wait for. A camera that must appear on demand from an automation has to be always-on — leave this unticked so the playlist is already there when Alexa asks. On-demand is for sources you choose to watch and can retry by hand. |
Optional — for announcing through a camera (pair with a camera's Audio set to
inject/inject_mix above). Full walkthrough in the Audio injection section below.
| Field | Required | Description |
|---|---|---|
Control API token (inject_token) |
No (recommended) | A password you make up to protect the audio-announcement API (the POST :8790/say endpoint that plays sound through a camera). Anything on your network that can reach that endpoint could otherwise play audio through your cameras, so set a long random string here and send the same value on every call (HTTP header X-Inject-Token, JSON field token, or ?token= in the URL) — a wrong or missing value gets a 403. This is unrelated to your camera or Home Assistant passwords; you invent it. Leave it blank only for a quick local test. |
Default TTS engine (tts_engine) |
No | Which text-to-speech voice Home Assistant uses when you send a {"text": "…"} announcement and let the add-on speak it. It's the entity ID of a TTS engine you've set up in Home Assistant under Settings → Voice assistants — for example tts.google_en_com. The Configuration form gives you a dropdown of the engines you already have installed, so you don't have to type or guess it. Only needed for the text mode of audio injection (not when you play a ready-made audio URL). Any camera can override this voice for its own announcements in its Edit dialog (blank = use this default); a POST /say can also override it per call with an engine field. |
ha_base (advanced, YAML only) |
No | Advanced, rarely changed — there's no form field for it. The web address the add-on uses to fetch audio that Home Assistant generates for {"text": …} announcements. Defaults to http://homeassistant:8123 (Home Assistant's internal hostname), which works for almost every install. Only set this if your Home Assistant isn't reachable at that address. |
| Field | Required | Description |
|---|---|---|
HLS buffer segments (hls_list_size) |
No | How many segments Alexa buffers before it starts playing — i.e. how far behind real-time the live view sits. Alexa (like most HLS players) begins near the back of this buffer, so a deeper buffer = more lag. Lower it to reduce lag — default 4; try 3, then 2, watching for stalls/stutters (a smaller buffer is less forgiving of a slow fetch). Range 2–10. Note each segment is only cut at a source keyframe, so in copy mode a segment is as long as your camera's keyframe interval (a 2-second keyframe interval → 2-second segments → more lag). The single biggest latency win is setting your camera's sub-stream I-frame interval to ~1 second (= its frame rate) so segments are 1s — the Validate streams tab detects and shows your camera's current I-frame interval so you can trace it back and tune it (see Live-view latency). Leave this blank to use the default of 4. |
Transcode resolution (transcode_scale) |
No | Output size for cameras on mode: transcode only (a copy camera keeps its source resolution — you pick that at the camera). Written WIDTHxHEIGHT, default 1280x720. It's a box the video is scaled within, aspect preserved (no stretch, even for a 4:3 source), so a widescreen source fills it and a 4:3 source fits inside it. Drop it to cut bandwidth/latency on a small or far Echo — e.g. 854x480 or 640x480 looks fine on the little screen and pushes far fewer bytes. Range 160x120–1920x1080. Any camera can override this (and the others below) in its Edit dialog. |
Scale mode (scale_mode) |
No | How the video fits the resolution box, default fit. fit shrinks it inside the box preserving aspect (no distortion — a 4:3 source gets pillar-boxed to fit); stretch forces the exact WIDTHxHEIGHT, distorting anything that isn't that aspect ratio. Leave on fit unless you specifically want to fill a mismatched frame. |
Transcode frame rate (transcode_fps) |
No | Output fps for transcode cameras, default 15. Also sets the keyframe interval (one keyframe per second is kept regardless). Lower fps = fewer bytes; range 5–30. |
Transcode bitrate cap (transcode_bitrate) |
No | Peak output bitrate in kbps for transcode cameras, e.g. 1500. Blank/0 = uncapped (quality-based). This is often the biggest lever for a jittery, Wi-Fi-starved stream — capping the bitrate bounds how many bytes each segment can be, so the Echo's link never has to fetch a sudden spike. Range 200–20000. Only affects transcoded cameras (a copy camera's bitrate is whatever the source sends). |
There are two ways to point the add-on at your cameras. The stream Alexa receives is identical either way — the only difference is where the add-on pulls the video from, and you can mix per camera. The View as YAML toggle in the Configuration tab shows your live config in this form.
The add-on connects straight to each camera's RTSP — the simplest setup: it maintains a stream to each camera with no additional configuration necessary.
lan_ip: 192.168.1.100                                # Home Assistant server's LAN IP (required)

# RTSP login shared by cameras that use `host`
rtsp_user: admin
rtsp_password: "your-password"                       # percent-encode reserved chars
rtsp_port: 554
default_path: "/cam/realmonitor?channel=1&subtype=1" # Amcrest/Dahua SUB stream

# Audio injection (optional) — announce THROUGH a camera; see "Audio injection" below
inject_token: "a-long-random-secret"                 # protects the :8790 control API
tts_engine: "tts.google_en_com"                      # default HA voice for {"text": ...}

cameras:
  - name: driveway                                   # -> /driveway/stream.m3u8
    host: 192.168.1.200                              # this camera's IP (direct)
    mode: transcode                                   # source isn't H.264 Baseline -> re-encode
    audio_source: inject_mix                          # optional — keep its audio + overlay announcements
  - name: porch
    host: 192.168.1.201
    mode: copy                                        # this camera's sub stream is already H.264 Baseline -> copy
audio_source: inject_mixIf you already run Frigate (or any go2rtc / RTSP restreamer), point the add-on at the restream instead of the camera. The camera then serves one stream to go2rtc, which fans it out to Frigate's detect/record and this add-on — so the add-on puts no extra load on the camera at all. That matters most for wireless / battery doorbell cameras (limited connections, flaky links): keep the bandwidth off them and they stream better.
A restream is pass-through — it delivers the source stream exactly as the camera is
configured. So if the source sub stream is already H.264 Baseline/Main (as it should be for
Alexa), you use copy here too — no extra transcode, near-zero CPU. (If the restream carries
H.265 / H.264 High, use transcode, same as direct.)
Give each camera a url pointing at its restream; host and the rtsp_* defaults aren't
needed for those cameras:
lan_ip: 192.168.1.100

cameras:
  - name: sideyard
    url: "rtsp://ccab4aaf-frigate:8554/sideyard_sub"     # go2rtc low-res (sub) restream
    mode: copy                                            # pass-through H.264 -> copy works
    audio_source: inject_mix                              # optional
  - name: garage
    url: "rtsp://ccab4aaf-frigate:8554/garage_sub"
    mode: copy
    audio_source: inject_mix
Stream names & host:
ccab4aaf-frigateis the standard Frigate add-on's internal hostname and:8554is go2rtc's RTSP port. Your exact stream names come from your go2rtc config — for Frigate they're typically<camera>(main) and<camera>_sub(low-res); browse them athttp://<frigate-host>:1984. Prefer the_sub(low-res) stream for Alexa.
Trade-off: a camera pulled through a restream now depends on that restreamer (Frigate/go2rtc) being up — if it goes down, that Alexa feed goes down with it. Keep any camera you want to stay independent on Option A (direct).
(A restream-only follow-cam like Frigate birdseye is configured here too, as a url camera —
see the Audio injection section for its on_demand specifics.)
Every camera brand serves its video at a slightly different RTSP path — the part of the link after the IP address and port (the Default RTSP path / per-camera Path setting). Which one is right is specific to your camera manufacturer (outside this add-on's control), but it's straightforward to find:
-
Look up your camera model's "RTSP URL" in its manual, or in a community database like iSpyConnect's camera list (searchable by brand/model).
-
Common starting points — always verify against your model/firmware:
Brand Typical sub-stream path Typical main-stream path Amcrest / Dahua /cam/realmonitor?channel=1&subtype=1/cam/realmonitor?channel=1&subtype=0Hikvision /Streaming/Channels/102/Streaming/Channels/101Reolink /h264Preview_01_sub/h264Preview_01_mainOther / ONVIF check the manufacturer or iSpyConnect — -
Prefer the sub-stream (lower resolution) for Alexa — it's plenty for a small Echo Show screen and, if it's H.264, needs no transcoding.
-
Test it before wiring up Alexa. The full stream URL is
rtsp://<user>:<password>@<camera-ip>:554<path>. Paste it into VLC (Media → Open Network Stream), or runffprobe "rtsp://user:pass@192.168.1.201:554/your/path". If it plays / prints codec info, the path is correct — andcodec_nametells you whether to usecopy(h264) ortranscode(hevc). Rather not fiddle with VLC/ffprobe? The add-on's own Validate streams tool runs this exact check for you — that's next.
The Validate streams tab runs the manual RTSP check above for you, and adds a second check on the add-on's own output. Per camera it reports:
- Source — ffprobes the camera's RTSP feed and checks its codec/profile against the camera's
mode— e.g. it flags an H.265 / H.264-High source left oncopy. - Output — confirms the add-on's
:8888HLS is live and decodable H.264 Baseline (what Alexa actually opens). When the stream is live it also reports the live-view latency and the detected camera I-frame interval — see Live-view latency below for how to read it and cut the lag.
Each camera card also shows how the add-on read its config, in aligned columns under a header (Mode · Source · Path · Audio · On-demand) — so you can scan straight down a column and instantly spot a camera interpreted differently than the rest. The columns:
- Mode —
copy/transcode. - Source — Direct (a Host/IP, pulled straight from the camera), Restream (green — a URL
pointing at a local restreamer, auto-detected when the host is your
lan_ip,localhost, a Frigate/go2rtc hostname, or port8554), or Direct URL (a full RTSP URL used as-is). - Path — default (no per-camera override — either the shared Default RTSP path, or the path baked into a full URL) or override (a per-camera Path).
- Audio —
inject/inject_mix, or–if none. Click a highlightedinject/inject_mixpill to fire a quick test message into that camera's audio (then view the camera on an Echo to hear it) — a fast sanity-check without setting up arest_command. - On-demand —
yes/–.
Hover any badge for the specifics (e.g. why Source matched Restream, or the exact Path used).
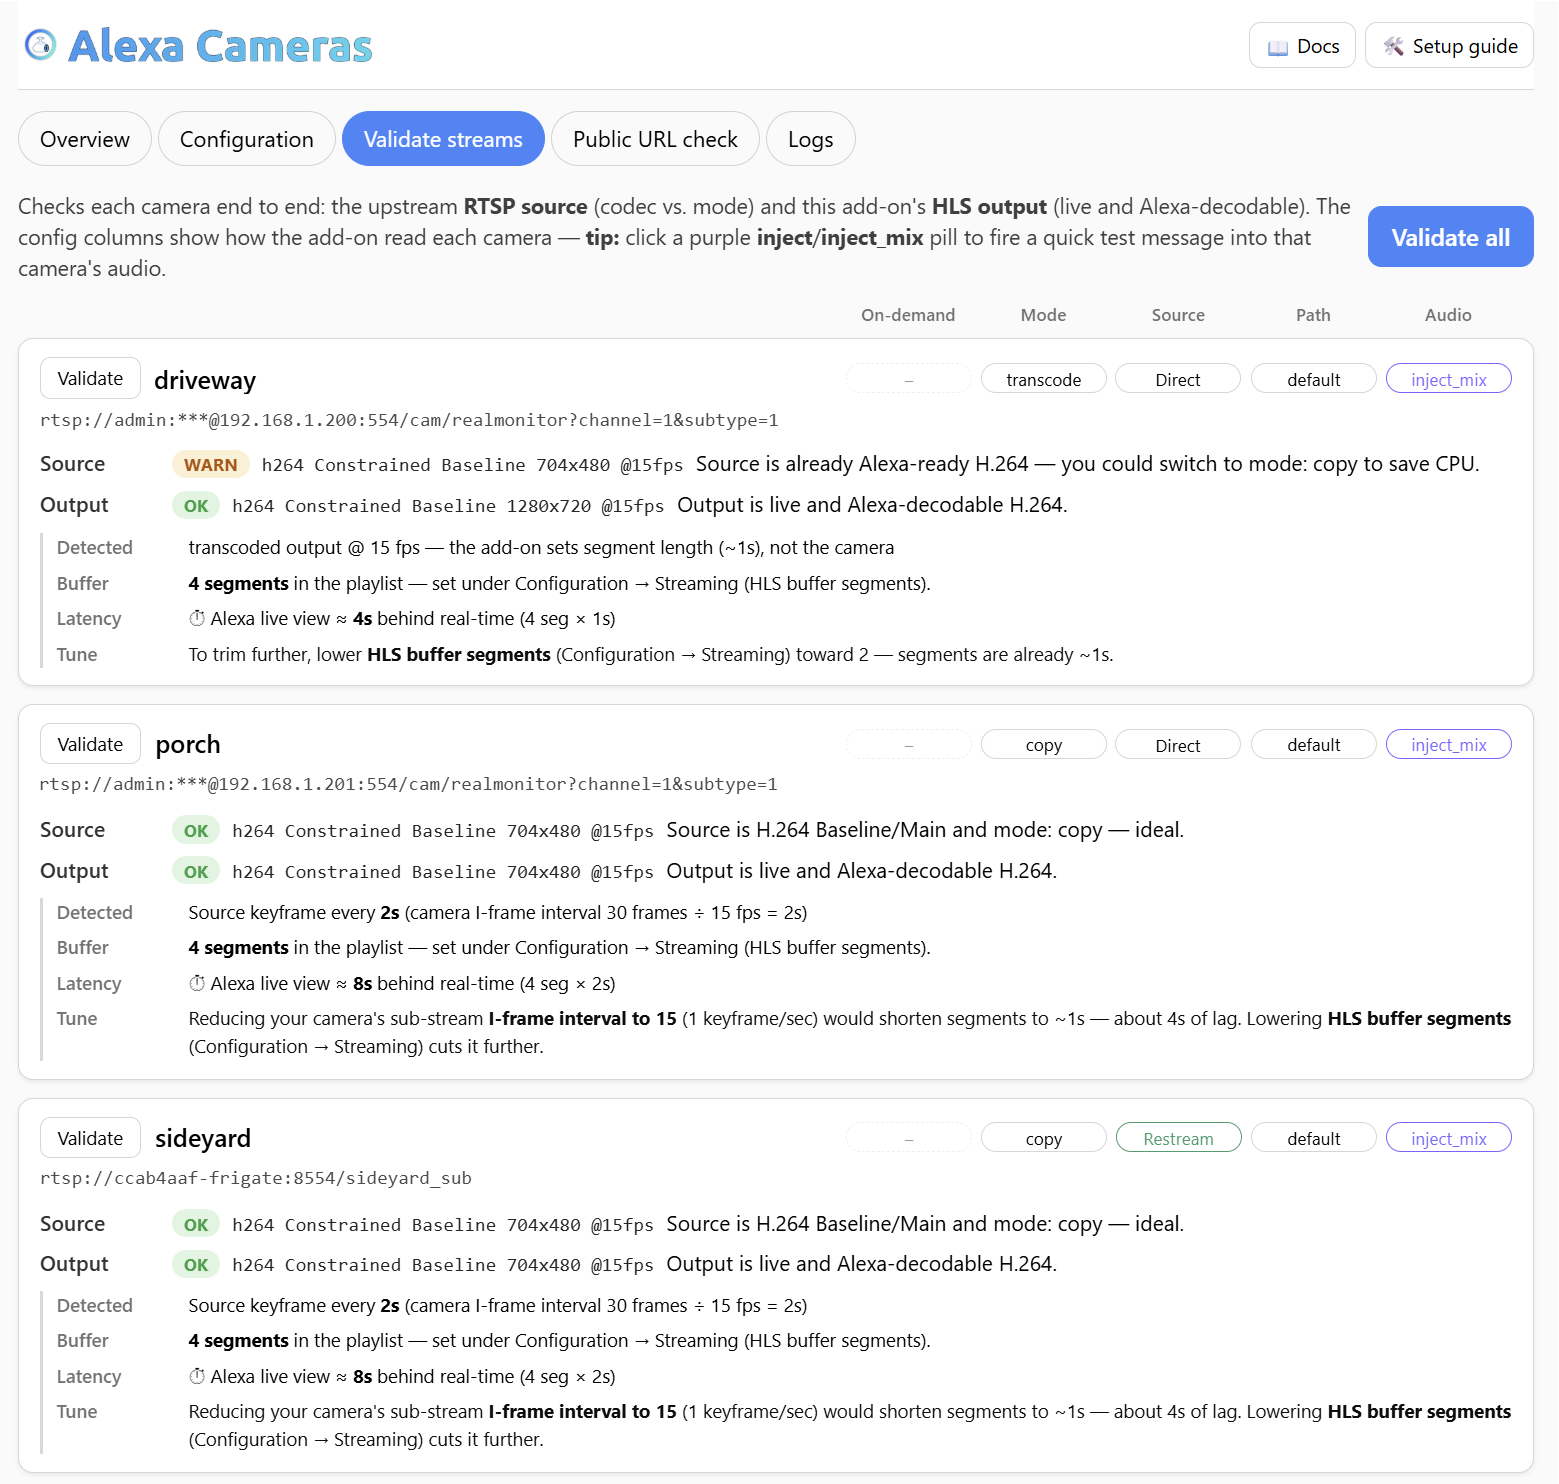
Green means good; anything off is flagged in plain English. Below, driveway on
transcode gets a WARN — its source is already Alexa-ready H.264 Baseline, so it could
switch to copy and save CPU — while porch and sideyard on copy read OK
(source is H.264 Baseline and the output is live, decodable H.264):
How the Source result is decided. A stream is "Alexa-ready" only if it's H.264 with a
Baseline / Constrained Baseline / Main profile. Anything else — H.265/HEVC, H.264 High,
or any other codec — is not decodable by the Echo. The tab compares that against the camera's mode:
| Source | mode |
Result | What it means |
|---|---|---|---|
| H.265, H.264 High, or other non-decodable | copy |
🔴 ERROR | "Source is NOT Alexa-decodable in copy mode. Set mode: transcode (or set the camera's sub stream to H.264 Baseline)." On copy the add-on only remuxes, so the Echo would get a codec it can't play — a black screen. This is the case you asked about: yes, it's flagged red, up front. |
| H.265, H.264 High, or other non-decodable | transcode |
🟢 OK | "Source needs transcoding; mode: transcode converts it to H.264 Baseline. Good." |
| H.264 Baseline/Main | copy |
🟢 OK | "Source is H.264 Baseline/Main and mode: copy — ideal." (lowest CPU) |
| H.264 Baseline/Main | transcode |
🟡 WARN | "Source is already Alexa-ready H.264 — you could switch to mode: copy to save CPU." |
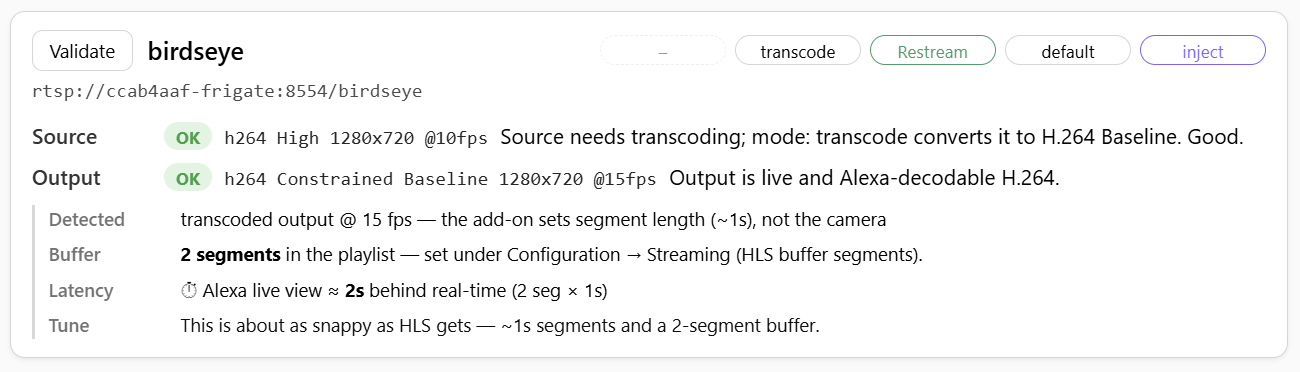
Row 2 in action — a live camera whose source is H.264 High (h264 High 1280x720, which Alexa can't
decode) on mode: transcode: the add-on converts it to H.264 Baseline and both Source and
Output read OK (this one happens to be a Frigate birdseye restream, but the same holds for any
H.265 / H.264-High source):
The Source label also shows exactly what ffprobe found (e.g. hevc Main 1920x1080 @15fps), so you
can see why it was flagged. The Output check is a second safety net — if what the add-on is
actually serving on :8888 isn't H.264 Baseline/Main it warns "OUTPUT is not H.264 Baseline/Main —
Alexa may show black" — but on a bad copy the Source check red-errors first. The one exception is an
on-demand source that's idle at probe time: it can't judge a stream that isn't flowing, so it reads
Idle instead of an error (see the birdseye note below).
Why the live view lags behind real-time — and how to make it snappy. When a camera is live, the Output check also breaks down its latency: what the add-on Detected (the segment length, and the camera's I-frame interval that sets it), your current Buffer depth, the resulting Latency with the math shown, and — when there's headroom — a Tune step to cut it:
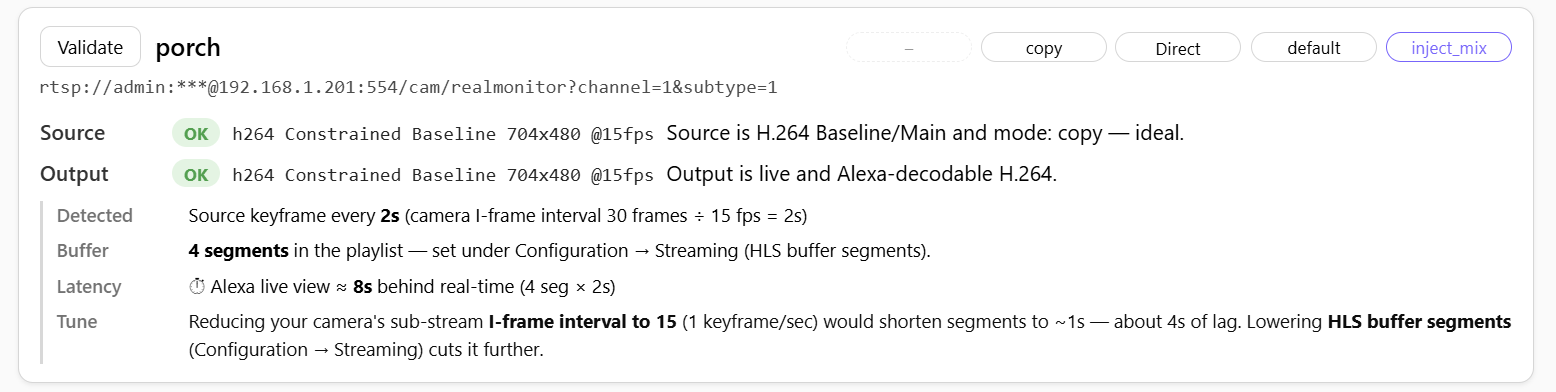
Alexa plays HLS, and HLS is a rolling buffer of little video files ("segments"). The player starts near the back of that buffer, so how far behind real-time you are is simply:
lag ≈ segment length (seconds) × number of segments in the buffer
Those are two independent knobs, and the readout shows both (4 seg × 2.0s = ~8s):
1. Segment length — set by your camera, not the add-on. In copy mode the add-on only
remuxes; ffmpeg can only start a new segment on a keyframe (I-frame). So a segment is exactly as
long as your camera's keyframe interval. The add-on asks for 1-second segments (-hls_time 1),
but it physically can't cut one until the next keyframe arrives — so if your camera emits a keyframe
every 2 s, you get 2-second segments no matter what. This is the single biggest lever.
-
Cameras express this setting as an I-frame interval in frames (sometimes labelled "GOP", "keyframe interval", or "I-frame interval"). Convert with your frame rate:
I-frame interval (frames) = keyframe interval (seconds) × fpsThe Output readout does this for you and shows the detected frame count so you can find the exact setting in your camera. In the example the sub stream is 15 fps with 2.0-second segments → an I-frame interval of 30 frames (30 ÷ 15 = 2 s). Log into the camera's web UI → the sub-stream encode settings, find the value reading 30, and change it to 15 (= your fps → one keyframe per second). Segments become 1.0 s → lag roughly halves. Don't go below ~1 s (1 keyframe/sec); shorter keyframe intervals only add bitrate for no real latency gain.
2. Number of segments — the add-on's hls_list_size (Configuration → Streaming → HLS buffer
segments). Default 4, range 2–10. Lower = less lag, but a shallower buffer is less forgiving
of a slow network fetch (watch for stutter). You cannot set it to 1 — a live playlist needs at
least a couple of segments or the player constantly runs dry and re-buffers; 2 is the floor.
Putting it together (using the example camera at 15 fps):
| Change | Segment length | Buffer | Alexa lag |
|---|---|---|---|
| (default) | 2.0 s (I-frame 30) | 4 | ~8 s |
| Camera I-frame 30 → 15 (1 s keyframes) | 1.0 s | 4 | ~4 s |
hls_list_size 4 → 2 |
2.0 s | 2 | ~4 s |
| Both (I-frame 15 and 2 segments) | 1.0 s | 2 | ~2 s |
Re-run Validate after each change and the ⏱ line updates live, so you can dial it in by feel.
Finding the I-frame interval on your camera. It lives in the sub-stream video-encoding settings (the low-res stream the add-on pulls — not the main stream), and brands name it differently:
| Camera | What the setting is usually called |
|---|---|
| Amcrest / Dahua | I Frame Interval (in frames), under Encode → Sub Stream |
| Hikvision | I Frame Interval (in frames), under Video → Sub-stream |
| Reolink | often fixed in firmware; newer models / ONVIF expose GOP or Max I-Frame Interval |
| Generic / ONVIF | GOP, Key Frame Interval, or Keyframe Interval |
Set it to one keyframe per second — a frame count equal to the sub-stream's fps (the readout shows you both numbers, e.g. 15 fps → set 15). A few cameras express this in seconds instead of frames; if so, just set 1 second. If yours only offers coarse presets, pick the smallest that gets you near ~1 s. Cameras behind a go2rtc / Frigate restream are the same — set it on the camera; the restreamer just passes the keyframes through, it can't shorten them.
If the readout doesn't change after you edit the camera: the add-on reads the new keyframe interval only when the stream reconnects — save on the camera, then wait a few seconds and re-run Validate (or restart the add-on). And double-check you changed the sub stream, not the main one.
What the Tune row tells you is context-aware — it only ever names a lever that will actually help, so its wording changes with your current state:
| Your state | Tune says |
|---|---|
Segments > 1 s, copy source |
The exact I-frame frame count to set for 1-second segments, and the resulting lag (plus "lower buffer too" if it's above 2). |
| Segments already ~1 s, buffer > 2 | Lower HLS buffer segments toward 2. |
| ~1 s segments and a 2-segment buffer | "about as snappy as HLS gets" — nothing left to do. |
transcode source |
Segment length is the add-on's (~1 s), so it points you at the buffer, not the camera. |
Transcode mode is different. When a camera runs
mode: transcodethe add-on re-encodes the video and inserts its own keyframes to honor-hls_time 1, so segments are ~1 s regardless of the camera's keyframe interval — the readout says so and doesn't quote a camera I-frame value (changing it wouldn't help). Transcoding costs CPU, though; if your sub stream is already H.264 Baseline,copy+ a 1-second camera keyframe interval gives you low latency and low CPU.
The latency tuning above has a flip side worth understanding before you chase a "bug." An Echo Show is a Wi-Fi device pulling a real-time stream, and a real-time stream carries almost no safety buffer — that's the whole point of low latency: the player stays only a couple of seconds behind live, so unlike Netflix (which buffers minutes ahead and rides out any hiccup) a live camera has nothing in reserve. If the Echo's Wi-Fi is weak, or your network is momentarily slow, a segment arrives late and you get stutter, a brief freeze, a flash of black, or a "connecting…" re-buffer.
This is almost always the Echo's network link, not the add-on. The add-on serves the exact same segments to every viewer, so the quickest way to prove it is to open the same stream on a wired computer — the Served at link on the Overview tab — while the Echo is stuttering. If the wired browser is smooth, the segments are fine and the Echo's Wi-Fi is the bottleneck.
Fixes, roughly in order of impact:
- Improve the Echo's Wi-Fi — the big one. A distant Echo on congested 2.4 GHz is the classic cause; move it closer to an access point (or add one nearby), and prefer 5 GHz if the Echo and AP support it. Echoes are Wi-Fi-only, so their radio environment is the lever that matters most.
- Raise the buffer — the deliberate opposite of the latency tuning above. A deeper HLS buffer segments (Configuration → Streaming) gives the player more slack to absorb a slow fetch, at the cost of a little more lag. If you dropped it to 2 to cut latency and now see stutter, put it back to 4 (or higher). Smoothness vs. lag is exactly the dial you're trading.
- Feed the low-res sub stream, not the main. A 4K/high-bitrate feed is far more to push over Wi-Fi than an Echo Show can use or display. Point the add-on at the camera's sub stream — small and low-bitrate, it looks fine on the little screen and there's simply less to drop. If your sub stream is still high-bitrate, lower its bitrate/resolution in the camera's own settings.
- Reduce network congestion. Other heavy Wi-Fi users, a saturated internet uplink (Amazon's relay fetches your stream over the WAN), or many cameras transcoding at once can all starve the fetch.
So: lower the buffer for less lag, raise it for smoother playback — and if a wired browser is smooth while the Echo isn't, spend your effort on the Echo's Wi-Fi, not the add-on.
⚠️ Heads-up about Frigate birdseye — it is slow to cold-start. Choose on-demand vs always-on by who opens it.Birdseye has two layers, and it only makes sense once you see both:
- Frigate's birdseye producer runs continuously (
restream: true+idle_heartbeat_fps) — when nothing's being tracked it just shows the Frigate logo (a camera leaves birdseyeinactivity_thresholdseconds after its last activity, so idle birdseye = the logo, not black).- go2rtc re-encodes that to H.264 for its RTSP restream, using a hardware (
h264_qsv) encoder that runs on demand — it pauses when nothing is consuming the stream, and is slow to spin back up on the next connection.How slow: ~60 seconds from a cold connection to the first playable segment (measured, with
idle_heartbeat_fps: 10already set — it helps, but doesn't remove the cold start). Plan around that number; it's the whole decision.Pick based on who opens it:
Who opens birdseye Setting Why An automation (auto-show on a detection) Always-on ( on_demand: false)On-demand cannot win this race. The request that starts the stream necessarily arrives before any playlist exists → 404→ Alexa doesn't retry, it gives up. The stream then spins up and plays to nobody.You, occasionally, by voice/browser On-demand ( on_demand: true)Saves the encoder + transcode running 24/7 for something nobody's watching. The first "Alexa, show birdseye" from cold will fail; ask again and it works. If you use the auto-show recipe, birdseye must be always-on — that's the only way the playlist is already there when Alexa asks. The ~60 s cold start then happens once, at add-on start, instead of on every detection.
What on-demand gives you (when it fits): the add-on runs it truly lazily — no connection at all while nothing's watching, pulling only while it's actually viewed and dropping it ~45 s after the last request. It also quiets that camera's logs, skips the stall watchdog, and is skipped by Validate streams (so validating doesn't wake it) — its card reads Idle — on-demand with a Check on-demand stream button to test it deliberately. (Even while watched, if the source can't produce, the add-on backs off 5 s → 5 min before retrying.)
(An always-on birdseye runs fine — this was soak-tested for an hour with no ill effect. The churn/wedge risk needs a genuine reconnect storm, which
idle_heartbeat_fpslargely prevents. On-demand is an efficiency choice, not a guard against a crash — so trade that efficiency away without hesitation when something other than you has to open the camera.)Normal vs. broken:
- Idle on birdseye = normal (the encoder is paused). On-demand cameras validate as Idle (skipped so they aren't woken); use Check on-demand stream to poke it deliberately.
- A persistent
404that stays down even while Frigate is clearly tracking activity — and your detection / browser-mod popups / automations have gone dead too — is not normal idle: Frigate's pipeline has wedged. Most often that's a flaky or overloaded camera (frequently a wireless one) spewing corrupt recording segments into a "Too many unprocessed recording segments" backlog that stalls everything; a churned on-demand birdseye encoder can do the same. Restart the Frigate add-on to clear it (see Troubleshooting below).(On a normal, always-on camera — not on-demand — red/amber here is always a real problem worth chasing.)
On a camera you've ticked On-demand (a source that's idle/absent when inactive, and that you open rather than an automation) this is exactly how it should read on the Validate tab — both Source and Output show a calm blue Idle, because the add-on skips on-demand cameras so probing never wakes them. A Check stream button lets you wake it and test on purpose. No red, no amber — for an on-demand source, idle is the expected resting state:

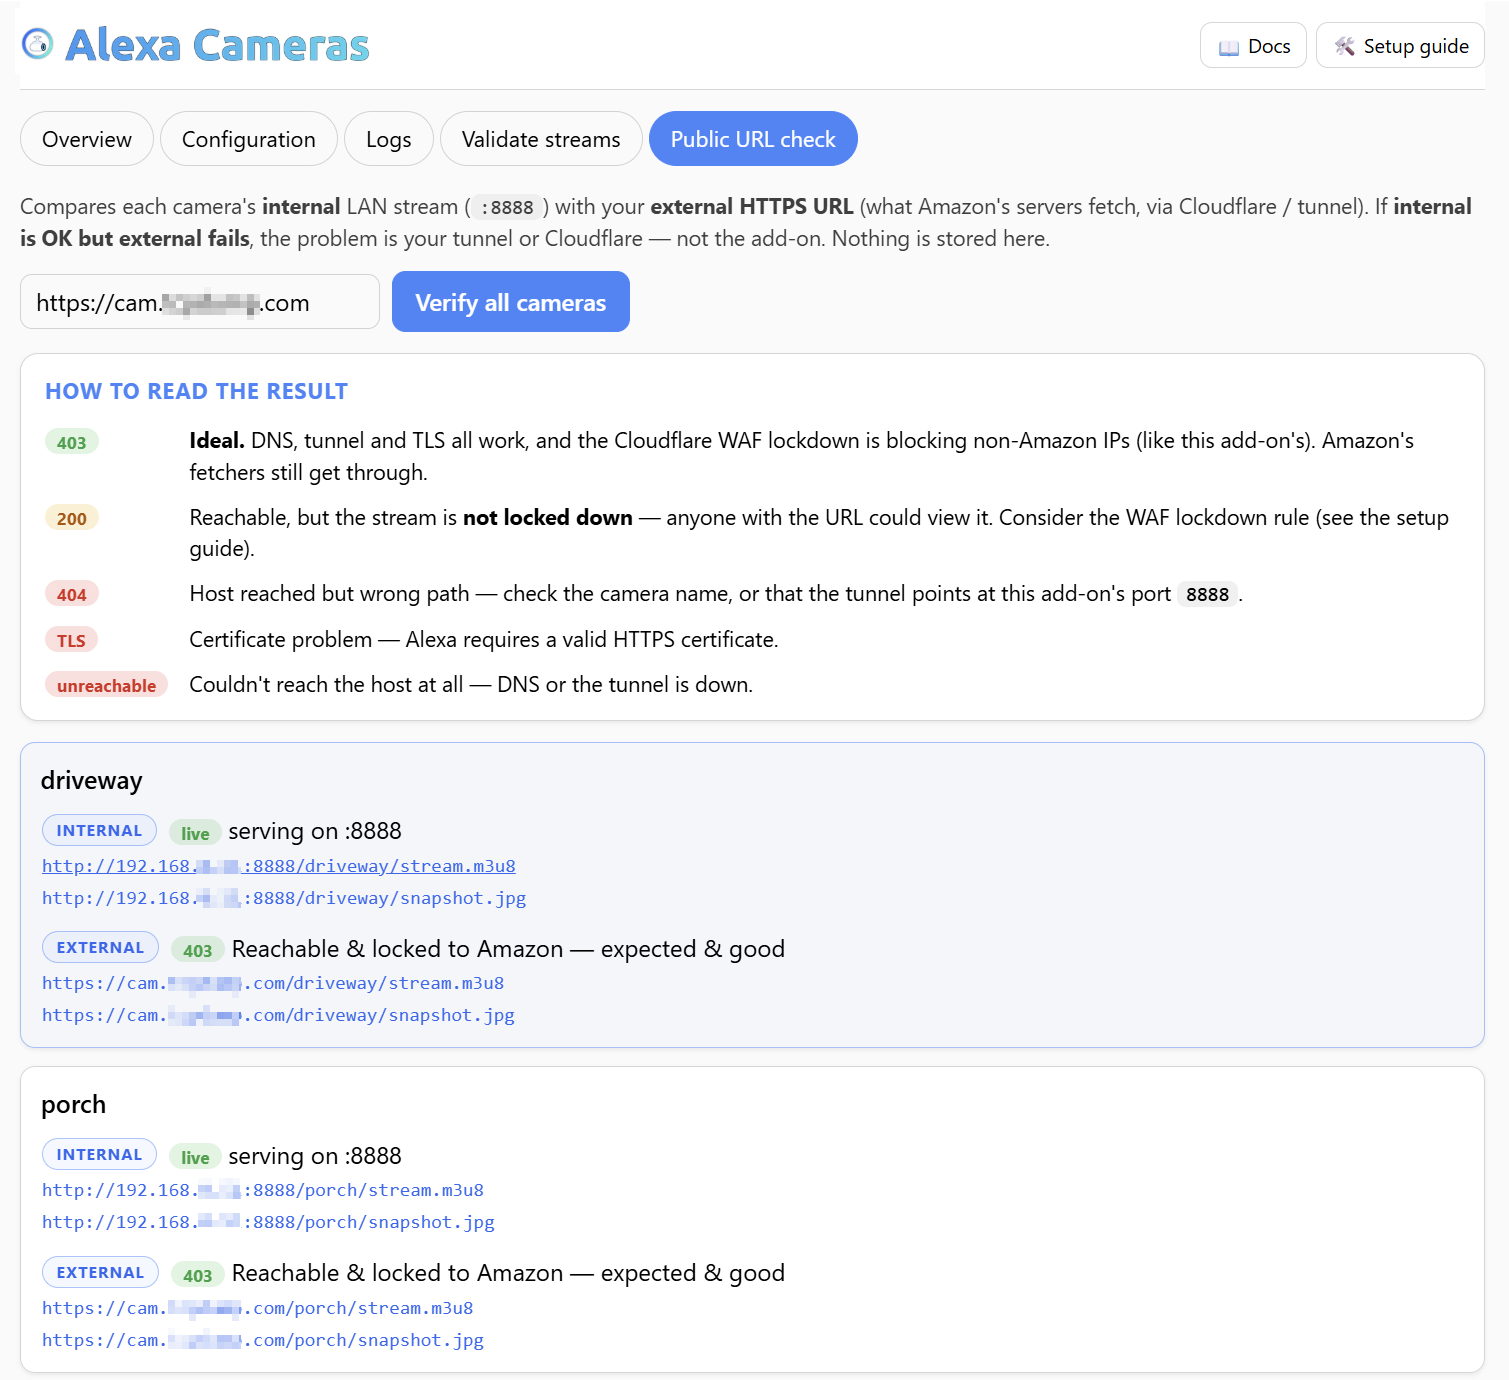
Once your camera is reachable over the internet (via the tunnel + Alexa skill — see the setup guide), this tab confirms the whole chain per camera. It compares:
- Internal — the LAN stream on
:8888(built from your Home Assistant IP), what the add-on serves directly on your network. - External — your public HTTPS URL, what Amazon's relay actually fetches.
Both show clickable stream + snapshot links. On the External side a 403 is the ideal result: the URL is reachable and your Cloudflare WAF rule is locking it to Amazon's fetchers. A 200 warns that the stream is reachable but not locked down — anyone with the URL could watch it (see the setup guide's WAF step).
The Logs tab is the add-on's black box: every camera worker announces how it started, and every
request to :8888 is logged with the client IP. The quickest "black Echo Show" triage is to
open Logs, say "Alexa, show camera <name>", and watch which IP the
GET /<name>/stream.m3u8 requests come from — walked through under What a camera being viewed looks
like below. The manufactured examples that follow match the Example configuration from earlier
so you can compare them against your own output line-for-line.
Every log line is stamped with a [HH:MM:SS] local time. A start (or a Save & apply) opens with
a banner — a clear visual break so you can always find where a restart happened — immediately
followed by a configuration summary that dumps exactly how the add-on read your config
(passwords and tokens masked, so the whole block is safe to paste into a support request). The
examples below use the Example configuration from earlier — driveway (direct, transcode),
porch (direct, copy), sideyard/garage (restream, copy), and a birdseye follow-cam
(on_demand):
████████████████████████████████████████████████████████████████
   █████╗ ██╗     ███████╗██╗  ██╗ █████╗
  ██╔══██╗██║     ██╔════╝╚██╗██╔╝██╔══██╗
  ███████║██║     █████╗   ╚███╔╝ ███████║
  ██╔══██║██║     ██╔══╝   ██╔██╗ ██╔══██║
  ██║  ██║███████╗███████╗██╔╝ ██╗██║  ██║
  ╚═╝  ╚═╝╚══════╝╚══════╝╚═╝  ╚═╝╚═╝  ╚═╝
        C A M E R A S  (HLS)  —  RTSP → Amazon Echo Show
        v1.19.5   started 2026-07-13 08:14:01 MDT
        © 2026 Tom Hirt  ·  github.com/Hu1kSmash/ha-alexa-cameras
████████████████████████████████████████████████████████████████

[08:14:01] [init] timezone: America/Denver
[08:14:01] ──── configuration summary (safe to share — passwords/tokens masked) ────
[08:14:01] version=1.19.5  tz=America/Denver  ffmpeg=6.1.1
[diag] disk /tmp/hls: 41% used, 120.3G free of 234.0G (holds HLS segments + log)
[diag] lan_ip=192.168.1.100   ports: hls=8888 inject=8790 ui=8099
[diag] rtsp defaults: user='admin' port=554 path='/cam/realmonitor?channel=1&subtype=1' password=SET
[diag] inject_token=SET   tts_engine='tts.google_en_com'   ha_base=(default)
[diag] streaming defaults: buffer=4 scale=1280x720 mode=fit fps=15 bitrate=uncapped
[diag] cameras: 5
[diag]   driveway    transcode  host=192.168.1.200                              audio=inject_mix on_demand=no
[diag]   porch       copy       host=192.168.1.201                              audio=inject_mix on_demand=no
[diag]   sideyard    copy       url rtsp://ccab4aaf-frigate:8554/sideyard_sub   audio=inject_mix on_demand=no
[diag]   garage      copy       url rtsp://ccab4aaf-frigate:8554/garage_sub     audio=inject_mix on_demand=no
[diag]   birdseye    transcode  url rtsp://ccab4aaf-frigate:8554/birdseye       audio=inject     on_demand=YES  [buf=2]
[diag] ────────────────────────────────────────────────────────────
[08:14:01] Starting camera 'driveway' (192.168.1.200, mode=transcode, audio=inject_mix)
[08:14:01] Starting camera 'porch' (192.168.1.201, mode=copy, audio=inject_mix)
[08:14:01] Starting camera 'sideyard' (rtsp://ccab4aaf-frigate:8554/sideyard_sub, mode=copy, audio=inject_mix)
[08:14:01] Starting camera 'garage' (rtsp://ccab4aaf-frigate:8554/garage_sub, mode=copy, audio=inject_mix)
[08:14:01] Registered on-demand camera 'birdseye' (rtsp://ccab4aaf-frigate:8554/birdseye, mode=transcode, audio=inject) — connects only when watched
[08:14:01] Serving 5 camera(s): /<name>/stream.m3u8 and /<name>/snapshot.jpg on :8888
Web UI listening on :8099 (ingress)
[08:14:02] [injector] feeding 'driveway' at /tmp/inject/driveway.pcm
[08:14:02] [injector] feeding 'porch' at /tmp/inject/porch.pcm
[08:14:02] [injector] feeding 'sideyard' at /tmp/inject/sideyard.pcm
[08:14:02] [injector] feeding 'garage' at /tmp/inject/garage.pcm
[08:14:02] [injector] feeding 'birdseye' at /tmp/inject/birdseye.pcm
[08:14:02] [injector] control on :8790  cams=['driveway', 'porch', 'sideyard', 'garage', 'birdseye']
[08:14:02] [init] stall watchdog started (60s threshold)
[08:14:02] birdseye (on-demand) idle — not connecting until requested
A few things to read off it:
- The
[diag]block mirrors your config back the way the add-on parsed it — the effectivemode, source,audio, andon_demandper camera, plus any per-camera Advanced overrides in brackets (herebirdseyeshows[buf=2]). It's the fastest way to confirm the add-on read your intent, and it re-prints on every save, so the newest one is always at the bottom of the log. - Each
Starting camera …(orRegistered on-demand camera …) line echoes that camera's source,mode, andaudio_source. A healthy always-on worker then goes quiet — it only logs again if it fails (ffmpeg logs aterrorlevel). No news is good news. - The last line is the
on_demandbehaviour —birdseyeisn't being watched, so the add-on isn't connected to it at all (see below).
On a config save, the same banner + summary re-prints with the word reloaded (instead of
started) on the version line — a clean marker of exactly when the workers restarted, with the fresh
config right underneath it:
v1.19.5 reloaded 2026-07-13 09:02:18 MDT
Roughly once an hour (and immediately if the disk crosses 90 % full) the watchdog also logs a disk line, because when the filesystem fills, camera ffmpeg writes fail with No space left on device — this tells you before that happens:
[09:14:03] [disk] 41% used, 120.3G free of 234.0G (holds HLS segments + log)
Every request to :8888 is logged with the client IP. Ask "Alexa, show camera driveway" and
watch which IP shows up:
[08:20:11] 172.30.32.1 "GET /driveway/stream.m3u8 HTTP/1.1" 200 -
[08:20:11] 172.30.32.1 "GET /driveway/seg_00047.ts HTTP/1.1" 200 -
[08:20:12] 172.30.32.1 "GET /driveway/seg_00048.ts HTTP/1.1" 200 -
[08:20:12] 172.30.32.1 "GET /driveway/snapshot.jpg HTTP/1.1" 200 -
[08:20:13] 172.30.32.1 "GET /driveway/stream.m3u8 HTTP/1.1" 200 -
172.30.32.1(or any172.x) = Amazon's relay reaching the add-on through your Cloudflare tunnel. Seeing these when you ask Alexa means connectivity is fine — the stream is getting to the Echo. If the Echo is still black at this point, it's a codec problem, not the tunnel (see the black-screen row in Troubleshooting — usually a High-profile source onmode: copythat needstranscode).- Only your own LAN IP, and no
172.xat all when you ask Alexa = the request never reached the add-on. The problem is upstream: the Cloudflare tunnel, a WAF rule, or the Alexa skill / Lambda. 127.0.0.1lines are the add-on checking its own streams (the Validate streams tab and the Served at link) — internal, not Amazon.
An on_demand camera makes no source connection while nothing's watching, so its normal state is
one quiet "idle" line. When something actually requests it, it starts; ~45 s after the last request,
it stops again:
[08:14:02] birdseye (on-demand) idle — not connecting until requested
[08:31:40] birdseye (on-demand) requested — starting stream
[08:31:41] 172.30.32.1 "GET /birdseye/stream.m3u8 HTTP/1.1" 404 -
[08:32:10] 172.30.32.1 "GET /birdseye/stream.m3u8 HTTP/1.1" 200 -
[08:32:10] 172.30.32.1 "GET /birdseye/seg_00001.ts HTTP/1.1" 200 -
[08:33:35] birdseye (on-demand) unrequested 45s — stopping
[08:33:40] birdseye (on-demand) idle — not connecting until requested
That early 404 is expected for on-demand: the request that starts the stream necessarily
arrives before the first segment exists. A cold Frigate birdseye then takes ~60 s to produce its
first segment (see the Validate streams birdseye note), after which it serves 200s until you look
away.
⛔ If that 404 came from an automation, the view failed and won't recover. Alexa asks once,
reads the 404 as "camera unavailable", and gives up — the stream finishes warming and plays to
nobody, then stops 45 s later. The log looks exactly like the trace above, and the tell is a lone
404 with no 200 following it:
[14:55:25] 172.30.32.1 "GET /birdseye/stream.m3u8 HTTP/1.1" 404 -
[14:55:26] birdseye (on-demand) requested — starting stream
[14:56:11] birdseye (on-demand) unrequested 45s — stopping     <- nobody ever came back
That is not a bug to wait out — no client waits ~60 s. Fix it by making the camera always-on (untick On-demand), so the playlist is already there when Alexa asks. See the On-demand field reference. On-demand only suits cameras you open and can simply ask for twice.
ffmpeg errors are prefixed with the camera name ([porch] …), so you can tell which camera is
failing and why. The most common signatures:
Wrong password / special character not encoded — the camera rejects the login:
[porch] [rtsp @ 0x7f2a1c0] method DESCRIBE failed: 401 Unauthorized
[porch] [in#0 @ 0x7f2a0e0] Error opening input: Server returned 401 Unauthorized
[08:24:09] porch stream exited after 1s; restarting in 6s
→ Fix the Password (and percent-encode any @ : / ? # % — see the Password field above).
Wrong RTSP path — the camera answers but there's nothing at that path:
[porch] [rtsp @ 0x561f3a0] method DESCRIBE failed: 404 Not Found
[porch] [in#0 @ 0x561f2c0] Error opening input: Server returned 404 Not Found
[08:24:31] porch stream exited after 1s; restarting in 12s
→ Fix the Path for this camera's brand (see Finding your camera's RTSP path).
Wrong IP or port, or the camera is offline — nothing answers at all:
[porch] [tcp @ 0x55a9d20] Connection to tcp://192.168.1.201:554 failed: Connection refused
[porch] [in#0 @ 0x55a9c40] Error opening input: Connection refused
[08:25:02] porch stream exited after 0s; restarting in 24s
→ Check the Host / Port, and that the camera is reachable from Home Assistant. Notice the restart delay backs off (6 s → 12 s → 24 s …): a camera failing on bad credentials is retried slower on purpose, because some cameras lock out an IP after repeated failed logins.
A stream that connects but then freezes — the stall watchdog steps in:
[08:40:07] [watchdog] garage frozen 60s+ -> restarting its ffmpeg only (attempt 1/3)
→ Usually the source hiccuped; the add-on restarts only that camera (never the others). If a camera can't recover after 3 tries it logs a one-time "giving up" line and leaves it alone rather than restart-looping forever — that's your cue to check that specific camera/source.
Black Echo, but the snapshot works, and the Logs show 172.x GETs returning 200 with no
ffmpeg errors — this one has no error line at all; the tell is that everything looks healthy.
The Echo is receiving video it can't decode. → Set that camera's Mode to transcode (the
source is H.265 or H.264 High; the Echo needs H.264 Baseline).
A spoken Alexa announcement is a foreground interrupt: it tears the live camera view off the Echo Show. This lets you instead play an announcement through the camera's own audio track, which the Echo already plays — so the camera view never drops.
Enable it per camera with audio_source — pick it from the Audio column of the config
form, or set it in YAML:
audio_source |
Behaviour | Use for |
|---|---|---|
| (none) | Normal — the camera's own audio (if any) | default |
inject |
Replace the audio with the announcement feed (silence between announcements) | silent sources (Frigate birdseye), or any camera whose own audio you don't want |
inject_mix |
Keep the camera's own audio and mix announcements on top | cameras with useful audio (a doorbell, a mic'd cam). Requires the source to have audio |
Both work with copy or transcode, on any camera — and you can enable audio on as
many cameras as you like (each gets its own injection channel; /say's cam field picks
which one). On CPU: inject/inject_mix re-encode only the audio (the video is still
copied in copy mode), so the overhead is small. But inject_mix on every camera does add
a little per-camera work (decode the source audio + mix + re-encode), so it's not quite the
near-zero of plain copy — negligible for a handful of cameras, worth knowing at scale.
Anywhere a camera's audio pill appears in the Web UI — the Overview list, the Configuration
camera summary, and the Validate streams cards — that inject / inject_mix pill is a
one-click test button:

Click it and the add-on speaks a short "Audio injection test on the <name> camera." into that
camera's stream (using the camera's announcement voice, or the global default); the pill
briefly flips to sent ✓. It's the fastest way to check injection — and a per-camera voice — works,
with no token or rest_command needed. Two ways to confirm it landed:
- View that camera on an Echo Show as you click — you'll hear the announcement over the live view. (Audio only plays while the camera is actually being shown.)
- Open the Logs tab — every injection is logged, so you can verify it fired even without an Echo in
hand:
[18:19:38] [injector] say cam='porch' text "Audio injection test on the porch camera." (3936ms clip)
You set all of this from the Web UI (the per-camera Audio dropdown and the Audio injection panel), but here's the equivalent YAML — two injection-enabled cameras plus the two optional top-level settings that back the feature:
cameras:
  - name: birdseye
    url: rtsp://ccab4aaf-frigate:8554/birdseye
    mode: transcode
    audio_source: inject          # birdseye is silent -> replace
  - name: doorbell
    url: rtsp://ccab4aaf-frigate:8554/doorbell_sub
    mode: copy
    audio_source: inject_mix      # keep the doorbell's audio, announce over it

# Optional, top-level:
inject_token: "a-long-random-secret"   # require this on the control API (recommended)
tts_engine: "tts.google_en_com"        # default engine for the {"text": ...} convenience
# ha_base: "http://homeassistant:8123" # where the add-on fetches HA audio from (default is fine)Send it audio to play through a camera. Include the token (header X-Inject-Token, JSON
token, or ?token=) if you set inject_token.
There's also a health check: GET http://<addon-host>:8790/health returns
{"ok": true, "cams": ["birdseye", …]} — a quick way to confirm the injector is running and
see exactly which cameras are inject-enabled (no token required).
inject_token guards the control API. The injector can make any inject-mode camera play
arbitrary audio, so /say shouldn't be open on your LAN. Set inject_token to a long random
string in the add-on config; then every request must carry the same value — header
X-Inject-Token: <token>, JSON "token": "<token>", or ?token=<token> — or it gets 403
Forbidden. Leave it empty and /say accepts anything (fine for a quick test, but set one). It's
a static secret: the same value goes in the add-on config and in whatever calls /say (so if
you change it, change it in both places — e.g. the rest_command payload below). The port is
LAN-only regardless; the token is the second layer so nothing on your network fires a camera by
accident.
Using a different TTS — two independent paths, and this is the point of the design:
{text}mode renders speech with a Home Assistant TTS engine — the same engines Home Assistant's built-in Assist uses. You manage/add them under Settings → Voice assistants (/config/voice-assistants/assistants); install a TTS add-on/integration (Google Translate, local Piper, Home Assistant Cloud, ElevenLabs, a local-LLM TTS, …) and it appears there and as atts.*entity. Thetts_enginevalue is that entity ID — e.g.tts.google_en_com. Find the exact ID under Developer Tools → States (filtertts.), or just pick it from the dropdown in the add-on's config form (it lists your installed engines, so there's nothing to guess). Set the global default withtts_engine; give a single camera its own default voice in that camera's Edit dialog (an Announcement voice dropdown, shown when Audio isinject/inject_mix); or override per request with anenginefield:{"cam":"birdseye","text":"…","engine":"tts.piper"}. Precedence is requestengine→ the camera's own → the global default. Switching voices is a one-line change — the add-on just asks HA to render with that engine.{url}mode is completely TTS-agnostic — you make the audio however you like (any engine, a local LLM writing an MP3, a pre-recorded clip, a chime) and hand/saya URL to fetch. The add-on plays whatever's there; it has no idea what produced it. Use this for anything that isn't an HA TTS entity. (The URL must be reachable from the add-on's container.)
The control API only answers POST, so you can't fire it from a browser address bar. The
easy way to POST — from automations and by hand — is a Home Assistant rest_command:
Home Assistant does the POST for you, and each becomes a one-click action under Developer
Tools → Actions. Add these three to your configuration.yaml (create the
rest_command: block if you don't already have one), then reload from Developer Tools →
YAML → "REST commands" (no HA restart needed once the block already exists):
rest_command:
# Speak text — the add-on renders TTS with your default engine and injects it.
cam_say:
url: "http://192.168.1.100:8790/say" # your HA / add-on host's LAN IP + the control port
method: POST
content_type: "application/json"
payload: '{"cam": "{{ cam }}", "text": "{{ message }}", "token": "a-long-random-secret"}'
# Test beep — proves the pipe end-to-end without any TTS.
cam_beep:
url: "http://192.168.1.100:8790/say"
method: POST
content_type: "application/json"
payload: '{"cam": "{{ cam }}", "test": true, "token": "a-long-random-secret"}'
# Play any audio URL the add-on's container can reach.
cam_url:
url: "http://192.168.1.100:8790/say"
method: POST
content_type: "application/json"
payload: '{"cam": "{{ cam }}", "url": "{{ url }}", "token": "a-long-random-secret"}'Use the same inject_token value in all three payloads as in the add-on config (change it in
both places if you rotate it, or keep it in secrets.yaml and reference {{ … }}).
Try them by hand from Developer Tools → Actions while a camera is showing on an Echo:
# test beep
action: rest_command.cam_beep
data:
cam: driveway# speak text
action: rest_command.cam_say
data:
cam: driveway
message: "A vehicle is approaching the house"# play an audio URL
action: rest_command.cam_url
data:
cam: driveway
url: "http://…/clip.mp3"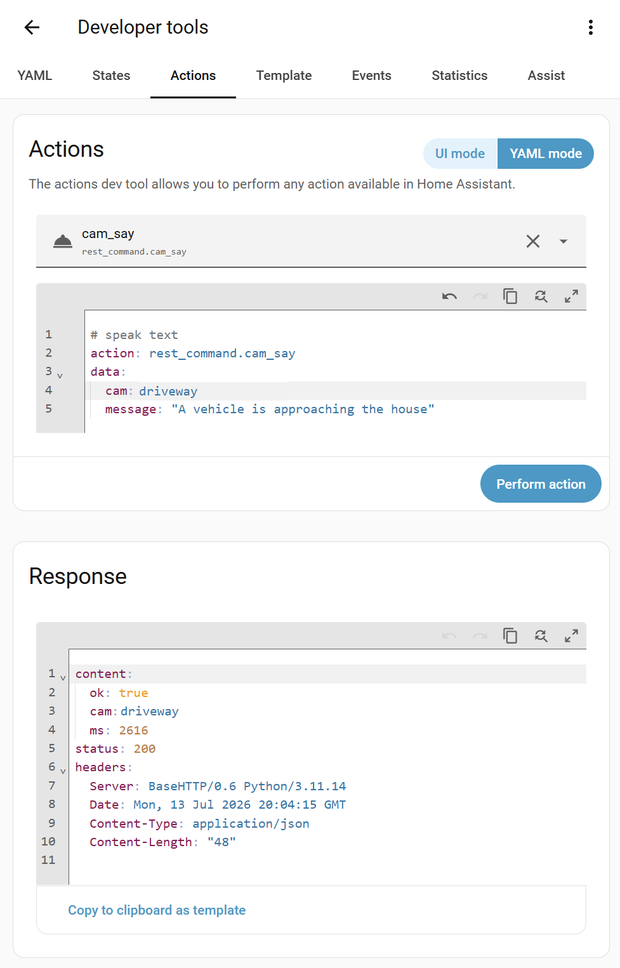
A successful call returns ok: true with the injected clip's length in ms; if the camera's
Audio isn't inject/inject_mix you'll get 400 no inject camera '<name>' instead (nothing
is played, no stream is touched).
In an automation, wire your detection trigger to cam_say:
automation:
- alias: "Car approaching → speak through birdseye"
triggers: [ … your detection trigger … ]
actions:
- action: rest_command.cam_say
data:
cam: birdseye
message: "A vehicle is approaching the house"Notes / limits. Audio only flows while the camera produces video, so on a source that
goes idle (e.g. birdseye at rest) an injected clip plays once activity resumes — fine for
detection announcements, which fire during activity. There's ~2-5 s of HLS latency on the
injected line. The injected audio plays at the Echo's camera-view volume (no independent
duck). The control port defaults to 8790 and is LAN-only — change it (or its host
mapping) under the add-on's Network settings if it conflicts with something, never
expose it to the internet, and protect it with inject_token.
- Each always-on camera runs as its own ffmpeg process — one bad camera can't take down the others — and is restarted automatically with exponential backoff (3s → 60s, reset after a healthy run) so a camera failing on bad credentials isn't hammered (some lock out an IP after repeated failed logins).
- An on-demand camera (
on_demand: true) is different: it runs lazily — no ffmpeg and no source connection at all while nothing's watching. The add-on's file server notes each request for the camera; ffmpeg starts the moment it's actually viewed (Alexa, the auto-show automation, a browser) and is dropped ~45 s after the last request. So a re-encoded, rarely-watched source like Frigate birdseye only runs its encoder while someone's looking — instead of 24/7 — and can't be reconnect-churned while it's idle. If a requested source still won't produce, it backs off 5s → 5min before retrying so even active viewing can't hammer it. On-demand cameras are excluded from the stall watchdog (idle is normal for them). - A stall watchdog covers the other failure mode: an ffmpeg that keeps running but stops producing (a frozen mux). If a camera's playlist stops advancing for ~60s it restarts only that camera's worker (never the add-on, never the other cameras), up to 3 times; if it still won't recover it gives up and logs a one-time warning for you to look into, rather than restarting forever.
- There's no input read-timeout on the pull: ffmpeg waits patiently for the first
keyframe, which matters for on-demand sources (e.g. Frigate birdseye). Keeping such a
stream warm — and running at real-time so it opens promptly on Alexa (too low and the
idle stream time-dilates, adding seconds to "show birdseye") — is the source's job:
set Frigate
birdseye.idle_heartbeat_fps: 10(see the birdseye recipe below for why). - ffmpeg errors are surfaced into the Logs, each line prefixed with the camera name
(
[porch] ...), so you can tell which camera is failing and why. - The Logs are built for support. Every line is stamped with local time; each start or save
prints a banner (
started/reloaded) so restarts are easy to find, followed by a configuration summary with passwords and tokens masked — safe to paste straight into an issue (see Logs). The watchdog also logs disk usage hourly (and warns at 90 % full), since a full filesystem is what makes ffmpeg writes fail. The log file self-truncates so it can't grow without bound.
| Symptom (in the Logs / Validate tabs) | Likely cause | Fix |
|---|---|---|
[cam] 401 Unauthorized looping |
Wrong password / unencoded reserved chars | Fix the password; the backoff prevents locking the camera out. |
[cam] Connection refused / timed out |
Wrong host, port, or camera offline | Verify IP/port; test the RTSP URL in VLC. |
[cam] 404 Not Found |
Wrong path for this camera/brand |
Fix path / default_path; confirm in VLC or the Validate tab. |
| Echo shows black, snapshot OK | Source is H.265 / H.264 High in copy mode |
Switch that camera to mode: transcode (or set its sub stream to H.264B). |
| Config won't save | Home Assistant IP missing or a hostname | Enter the HA server's private IPv4 (e.g. 192.168.1.100), not a hostname. |
Alexa black, no 172.x in Logs when asked |
Stream not reaching the add-on | Look upstream: Cloudflare / WAF / tunnel / Lambda (see the setup guide). |
| Camera on Alexa frozen after an add-on restart/update | Alexa holds the last frame when the HLS stream restarts | Re-show it ("Alexa, show <camera>"). Any add-on restart interrupts a live view. |
| Alexa video stutters / freezes / flashes black intermittently (but the stream is up) | The Echo is on Wi-Fi pulling a real-time stream with little buffer — usually weak Echo Wi-Fi or a slow/congested network, not the add-on | See Jittery or stuttering video: improve the Echo's Wi-Fi, raise HLS buffer segments, and feed the low-res sub stream. Tell-tale: if a wired browser plays the same stream smoothly, it's the Echo's link. |
[watchdog] <cam> … frozen → restarting in Logs |
That camera's stream stalled (frozen mux) and was auto-recovered | Usually self-heals. If it logs "giving up after 3 restarts", investigate that camera/source. |
Frigate birdseye shows 404 / Source-timeout / Output "not advancing" while idle |
Normal if it's on-demand — birdseye's go2rtc encoder pauses when nothing's consuming it (idle birdseye is just the logo) | Tick On-demand on birdseye: the add-on then leaves it alone while idle and reads it as Idle instead of an error. Viewing wakes it (~60 s cold-start, so a first "show birdseye" fails and asking again works). But if an automation shows birdseye, do the opposite — untick On-demand (see next row). |
An automation shows birdseye and it fails every time (Logs show a lone 404 for /birdseye/stream.m3u8 with no 200 after it) |
The camera is on-demand, so the request that starts the stream 404s — and Alexa doesn't retry. It's an unwinnable race: cold birdseye needs ~60 s to produce a segment | Untick On-demand (on_demand: false) on that camera so it's always-on and the playlist already exists when Alexa asks. The ~60 s cold start then happens once at add-on start. Costs a continuous transcode — trim it with a per-camera resolution/fps override if needed. |
Cameras 404 / detection / browser-mod popups / automations all go dead together (not just birdseye idle) |
Frigate's detect/record pipeline has wedged — usually a flaky or overloaded camera (often a wireless one) producing corrupt recording segments → a "Too many unprocessed recording segments" backlog that stalls everything; a churned on-demand birdseye h264_qsv encoder can cause the same |
Restart the Frigate add-on to flush the backlog (inference keeps running, but no events/streams are produced until you do). Then fix the root cause: sort out the flaky camera's link (Wi-Fi signal / AP). |
| Audio injection: nothing heard | Camera isn't being viewed, or audio_source not set |
Audio only plays while the camera is shown on an Echo; set the camera's Audio to inject/inject_mix (inject_mix needs the source to have audio). |
Audio injection: POST /say → 403 |
Missing / wrong token | Send inject_token (header X-Inject-Token, JSON token, or ?token=). |
Audio injection: POST /say → 400 no inject camera '<name>' |
That camera's Audio is none (or the name is wrong) — nothing is injected, no stream is touched |
Set the camera's Audio to inject/inject_mix and Save & apply (no add-on restart needed — the injector re-reads its cameras on save). The reply's cams list shows which cameras are inject-enabled; target one of those (or omit cam to use the first). |
Audio injection: {text} → 401 Unauthorized |
The add-on couldn't authenticate to Home Assistant to render the TTS (its call to HA's tts_get_url was rejected) |
Confirm a valid tts_engine is set in the Audio injection panel. If it persists, restart the add-on to restore its Home Assistant API access — or use {url} mode instead, which plays audio you provide and makes no HA TTS call. |
Audio injection: /say → 500 "No such file" |
The audio URL isn't reachable from the add-on's container | Prefer {text} (the add-on fetches internally). With {url}, point at something the container can reach — not an HA external LAN-IP URL. |
- Latency floor. Output is tuned for low latency (1-second segments), but Amazon's relay does not support LL-HLS, so ~3 seconds glass-to-glass is the floor.
- Use sub streams. An Echo Show is small; a low-res sub stream looks fine, cuts
latency, and lets you use
copy. - What Alexa actually receives. Every camera is delivered as H.264 video + AAC audio
(48 kHz, stereo, 64 kbps) in MPEG-TS. In
copythe video is passed through untouched and only the audio is normalized to that AAC — so evencopyre-encodes audio (cheap, and it's what Alexa requires). Intranscodethe video is additionally re-encoded to H.264 Baseline, 1280×720, 15 fps (Level 3.1); a higher-res or higher-fps source is downscaled to that. Those transcode defaults (resolution / fps / bitrate cap) are tunable under Configuration → Streaming (advanced). - Port 8888 is plain HTTP. Alexa requires HTTPS with a valid cert, so put HTTPS in front of 8888 (Cloudflare Tunnel, nginx, Caddy…). See the setup guide.
- Camera names in Alexa come from Home Assistant, not the
namefield here.
Out of scope for this add-on — this needs the community Alexa Media Player integration and your own Home Assistant automation. But it's a great trick, and a frequent question, so here's the recipe.
First, make birdseye playable at all. Frigate's birdseye restream is H.264
High profile, and Alexa only plays H.264 Baseline/Main — so "Alexa, show
birdseye" fails by default. Fix it exactly like an H.265 camera: serve birdseye
through this add-on with a url override and mode: transcode (High → Baseline),
then map it in your Lambda CAMERA_MAP and HA entity_config like any other camera:
cameras:
- name: porch # a normal camera (already H.264)
host: 192.168.1.201 # the camera's IP on your home network
mode: copy # just remux, near-zero CPU
- name: birdseye # the Frigate follow-cam
url: "rtsp://ccab4aaf-frigate:8554/birdseye" # Frigate birdseye restream
mode: transcode # High -> Baseline for AlexaNote: the snippet above is the add-on's camera config, not Frigate.
On the hostname:
ccab4aaf-frigateis the internal Docker hostname of the standard Frigate add-on (theccab4aafslug comes from Frigate's add-on repo — it's the same for everyone on that add-on, and it's not sensitive). If you run a different Frigate variant (Beta, a proxy add-on, a custom repo), your slug — and thus the hostname — differs; confirm yours if birdseye won't connect.
On the Frigate side, enable and tune birdseye so the restream both exists and stays alive — birdseye is on-demand, and by default it stops emitting frames when idle, so the stream goes silent and consumers (go2rtc → this add-on → Alexa) eventually drop it:
# Frigate config.yml
birdseye:
enabled: true
restream: true # exposes rtsp://<frigate>:8554/birdseye for the add-on to read
mode: objects # "follow-cam": show whichever camera currently has activity
quality: 8 # 1 is max quality/bitrate (wasteful); 8 is plenty for an Echo Show
# idle_heartbeat_fps is the KEY setting, and it does two jobs:
# 1) keeps birdseye emitting when idle so the restream never goes silent
# (default 0 = goes cold and drops out; too low, e.g. 1, starves keyframes
# so consumers can't re-establish);
# 2) sets idle RESPONSIVENESS. Frigate's birdseye producer declares a 10fps feed
# internally, so a lower value TIME-DILATES the idle stream (it runs slower than
# real-time) -- which is why "Alexa, show birdseye" can take ~8-10s to open while
# a normal camera is instant. Use 10 to match the producer so idle birdseye runs
# at real-time and opens promptly.
idle_heartbeat_fps: 10
layout:
max_cameras: 1 # one camera, full-frame (a true single follow-cam)idle_heartbeat_fps matters for two reasons: it keeps birdseye emitting while it's up (so the
add-on's puller doesn't lose a live stream mid-idle), and it keeps that stream running at
real-time so Alexa opens it promptly — set it too low and the idle timeline crawls (slower than
real-time), adding several seconds to "show birdseye" while a normal camera opens instantly.
⛔ For this recipe, birdseye must be always-on —
on_demand: false. This is the one setting that makes or breaks it.
idle_heartbeat_fpsonly keeps Frigate's producer fed — go2rtc still re-encodes birdseye with anh264_qsvencoder that pauses when nothing consumes the restream, and a cold start takes ~60 s to yield a first playable segment.That is fatal to an automation. If birdseye is
on_demand: true, the automation's own view request is what starts the stream — so it arrives before any playlist exists, gets a404, and Alexa gives up on the spot (it never retries). The stream then warms up ~60 s later and plays to an empty room. The automation fails 100% of the time from cold, and no amount of retrying, waiting, or timeout-tuning fixes it — the detection is long over by the time the encoder is ready.So set
on_demand: falseon birdseye. The add-on keeps the stream alive, the playlist is already there the instant Alexa asks, and the camera appears immediately. The ~60 s cold start pays itself once, at add-on start, instead of on every detection. The cost is a continuous transcode (~0.3–0.5 of a core) — trim it with a per-camera resolution / fps override if you care; it's a mosaic on a small screen. An always-on birdseye runs fine (soak-tested for an hour, no ill effect).Keep
on_demand: trueonly for a birdseye you open yourself and can ask for twice.
That makes camera.birdseye a fully valid Alexa camera — it displays correctly on an
Echo Show. But saying "Alexa, show camera birdseye" usually fails: Alexa
transcribes "birdseye" as "bird's eye" (two words) and can't match a device named
Birdseye, so the command falls through and times out. Two ways to get a trigger that
actually works:
- A voice Routine (nice trick). Make an Alexa Routine whose trigger phrase is what Alexa actually hears — e.g. "show birds eye" — and whose action is a Custom command that runs the exact device phrase "show camera birdseye". You say the natural phrase; the routine fires the exact command, bridging the transcription gap. (This works because the action is a custom utterance, not the routine's built-in "show camera" device action — that device action is the part that's unreliable for HLS cameras.) Alternatively, just rename the Alexa device to something it transcribes cleanly, like "Overview".
- An automation (hands-free / auto-show). The most reliable trigger of all — Home Assistant sends the exact text command, skipping speech matching entirely. See below.
Then, push it to a screen automatically (the reliable path). "Alexa, show …" is you asking. To make an Echo Show display a camera on its own — e.g. pop birdseye up the moment Frigate detects motion, or as a manual trigger that actually works — use the Alexa Media Player integration's text-command feature. It sends a phrase to a specific Echo as if you spoke it:
# inside a Home Assistant automation's actions:
- service: media_player.play_media
target:
entity_id: media_player.kitchen # your Echo Show
data:
media_content_type: custom
media_content_id: "show camera birdseye" # exactly what you'd say out loudTrigger that on a Frigate detection (e.g. sensor.<cam>_all_active_count above 0,
which counts only moving objects) and you get hands-free "pop the camera up when
something moves." Because birdseye (mode: objects, max_cameras: 1) follows the
active camera inside one stream, the Echo never reconnects as activity moves
between cameras. Send media_content_id: "stop" the same way to dismiss it.
Caveats: this rides Alexa Media Player's unofficial text-command API (issues →
that project); use the reliable
show camera <name> phrasing, since Alexa intercepts the bare word "doorbell."
Not part of this add-on — just a handy community tool you'll probably want once you've added a pile of cameras and need to wipe Alexa's device list and start clean.
Whenever you change which entities you expose to Alexa (or rename cameras), Alexa tends to keep the old devices lingering — and duplicate/stale names collide with voice commands and routines (e.g. "Alexa, show front doorbell" landing on the wrong camera). Amazon has no built-in "delete all devices" button.
Shereef/Python-Delete-Alexa-Devices documents a browser-console method to bulk-delete all your Alexa smart-home devices at once, after which you re-discover a clean set. Method write-up: issue #9.
⚠️ Use at your own risk. This deletes every smart-home device from your Alexa account — not just cameras. Re-discovery rebuilds whatever you currently expose, but any Alexa Groups/Routines referencing those devices may need to be rebuilt. It uses an unofficial Amazon endpoint that can change without notice.
1. Find your region's JSON endpoint. Sign in to Amazon, then open each of these in a tab until one returns JSON/text containing your device list (the others 404 or redirect):
https://alexa.amazon.com/api/behaviors/entities?skillId=amzn1.ask.1p.smarthome
https://pitangui.amazon.com/api/behaviors/entities?skillId=amzn1.ask.1p.smarthome
https://layla.amazon.com/api/behaviors/entities?skillId=amzn1.ask.1p.smarthome
https://alexa.amazon.de/api/behaviors/entities?skillId=amzn1.ask.1p.smarthome
https://alexa.amazon.co.jp/api/behaviors/entities?skillId=amzn1.ask.1p.smarthome
2. On that same domain, open DevTools → Console (F12). If pasting is blocked,
type allow pasting first, then run (lists every endpoint via GraphQL, then
DELETEs each):
devices = await (await fetch('/nexus/v1/graphql', { method: 'POST', headers: {"Content-Type": "application/json","Accept": "application/json"}, body: JSON.stringify({query: `query { endpoints { items { friendlyName legacyAppliance { applianceId }}} } `})})).json();for (const device of devices.data.endpoints.items) console.log(await fetch(`/api/phoenix/appliance/${encodeURIComponent(device.legacyAppliance.applianceId)}`, { method: "DELETE", headers: { "Accept": "application/json", "Content-Type": "application/json"}}))3. Refresh the page, then say "Alexa, discover devices."
If the fetch returns 401, issue #9 documents a fallback that adds a CSRF token header.
Please open an issue at github.com/Hu1kSmash/ha-alexa-cameras/issues — and paste your Logs. The add-on prints a masked configuration summary on every start and save (passwords and tokens are redacted, so the whole block is safe to share), and camera failures are logged with the reason; that context is usually all it takes to spot what's wrong. The more of the log you include, the faster it can be sorted out.
And if you've made it this far, you've done the hard part on the add-on itself. The remaining pieces — HTTPS in front of port 8888, the self-hosted Alexa skill, the AWS Lambda camera override, and the Cloudflare Tunnel + WAF that ties it all together — are what actually carry these streams to your Echo Show. For the whole picture end to end, read the End-to-End Setup guide.
Thanks for running it. 📷
© 2026 Tom Hirt · Licensed under Apache-2.0 (see LICENSE and NOTICE) · github.com/Hu1kSmash/ha-alexa-cameras
{"cam": "birdseye", "text": "A vehicle is approaching"}   // add-on renders TTS (tts_engine) itself
{"cam": "birdseye", "url": "http://…/clip.mp3"}           // play any audio URL you provide
{"cam": "birdseye", "test": true}                          // built-in test beep